If you already have an n8n workflow, you may be closer to having a web app than you think. The missing piece is not always more automation. Sometimes it is a clean interface that lets someone use what you have already built.
But this is about more than generating a front end and pointing it at a webhook. With the right tools, Claude Code can inspect your existing workflow, work out what needs to change, update the backend, build the interface, and help troubleshoot both sides.
That is the part that seriously impressed me. It can reason through the workflow node by node, rather than just swap out the trigger and hope everything works.
We will use a simple fitness coach as the main example, then take it from a local project to a deployed app using GitHub and Vercel. You do not need to understand every line of code to follow the process. You do need to communicate clearly, review the changes, and test what gets built.
What You'll Learn
- Prepare n8n workflow inputs, outputs, memory, and error handling before building a custom interface.
- Give Claude Code project instructions, MCP tools, and skills to coordinate backend and frontend changes.
- Test locally, push code to GitHub, and use Vercel to deploy subsequent updates.
- Review credentials, webhook exposure, and backend protection before sharing a public app.
Table of Contents
- What It Actually Means to Turn an n8n Workflow into an App
- Understand the Architecture First
- Step 1: Set Up Claude Code in VS Code
- Step 2: Connect the MCP Servers and Skills
- Step 3: Have Claude Audit and Prepare the n8n Workflow
- Step 4: Plan and Build the Front End
- Step 5: Troubleshoot the Front End and Backend Together
- Step 6: Push the App Code to GitHub
- Step 7: Deploy with Vercel and Test the Live Connection
- Run a Security Review Before Sharing the App
- Keep Improving the App Without Rebuilding the Setup
- The Real Skill Is Directing the Whole Build
What It Actually Means to Turn an n8n Workflow into an App
Before building the fitness coach, I tried this with a more involved workflow that generates UGC-style ads. The original automation accepted a form submission containing a product name, product photo, avatar, features, and video setting. It then generated an ad.
To make that useful from a custom web app, Claude Code made several connected changes:
- Replaced the form trigger with a webhook so the app could submit the information.
- Handled the incoming image format. In this implementation, the front end sent the photo as a Base64 string, so the workflow needed to convert it.
- Updated downstream expressions because the input data now came from a different source and structure.
- Returned a useful response with a success status and video URL that the interface could embed.
- Added error branches to HTTP requests so failures could produce an error message in the app.
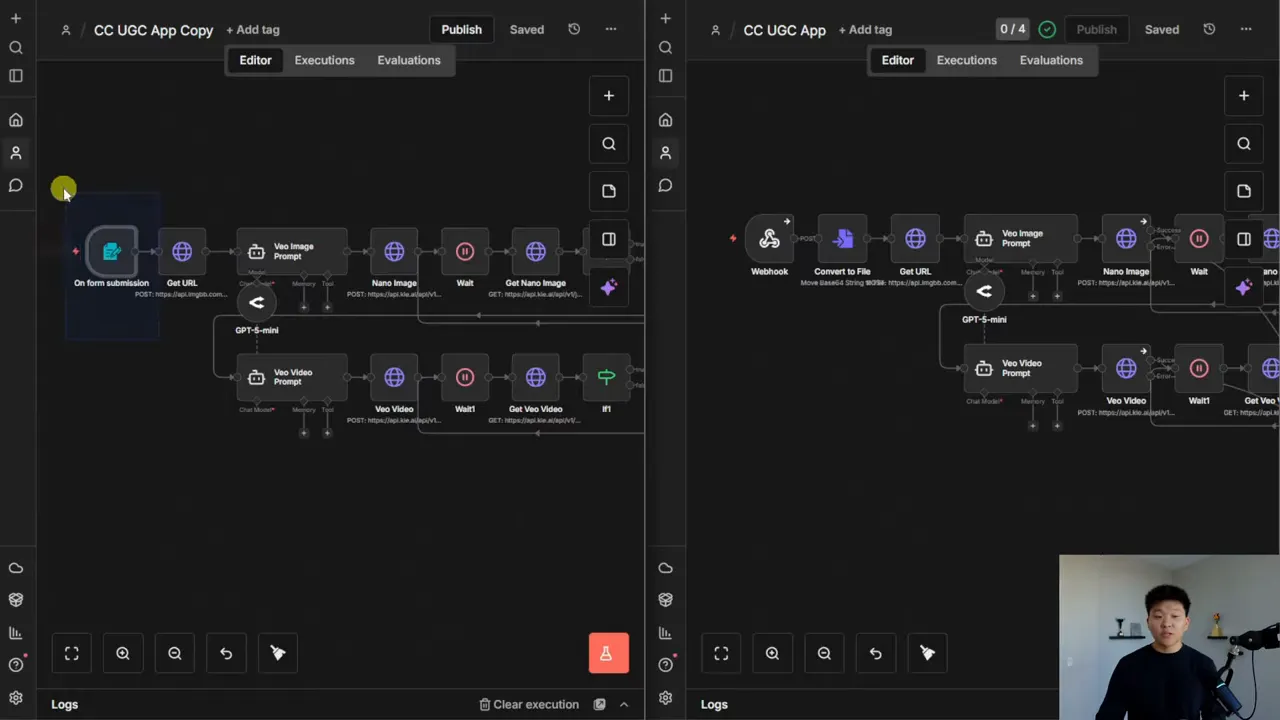
The resulting interface let me submit product details, see a processing job, and then access the generated video with a download link. That initial build took me roughly 40 minutes, although that is an example, not a promise for every project.
The important principle is simple: make the backend ready for the interface before building the interface around it.
Understand the Architecture First
There are a few moving pieces, but each one has a clear job:
- Claude Code: Works on your local project, writes the app code, and uses connected tools to inspect or modify workflows.
- n8n: Runs the backend automation, including the AI agent in our fitness coach example.
- MCP servers: Give Claude Code access to tools and information for n8n and GitHub.
- Skills: Provide guidance for tasks such as building n8n workflows and designing front ends.
- GitHub: Stores the app code in a repository and records versions through commits.
- Vercel: Deploys the app to a public URL and can automatically build new deployments from GitHub changes.
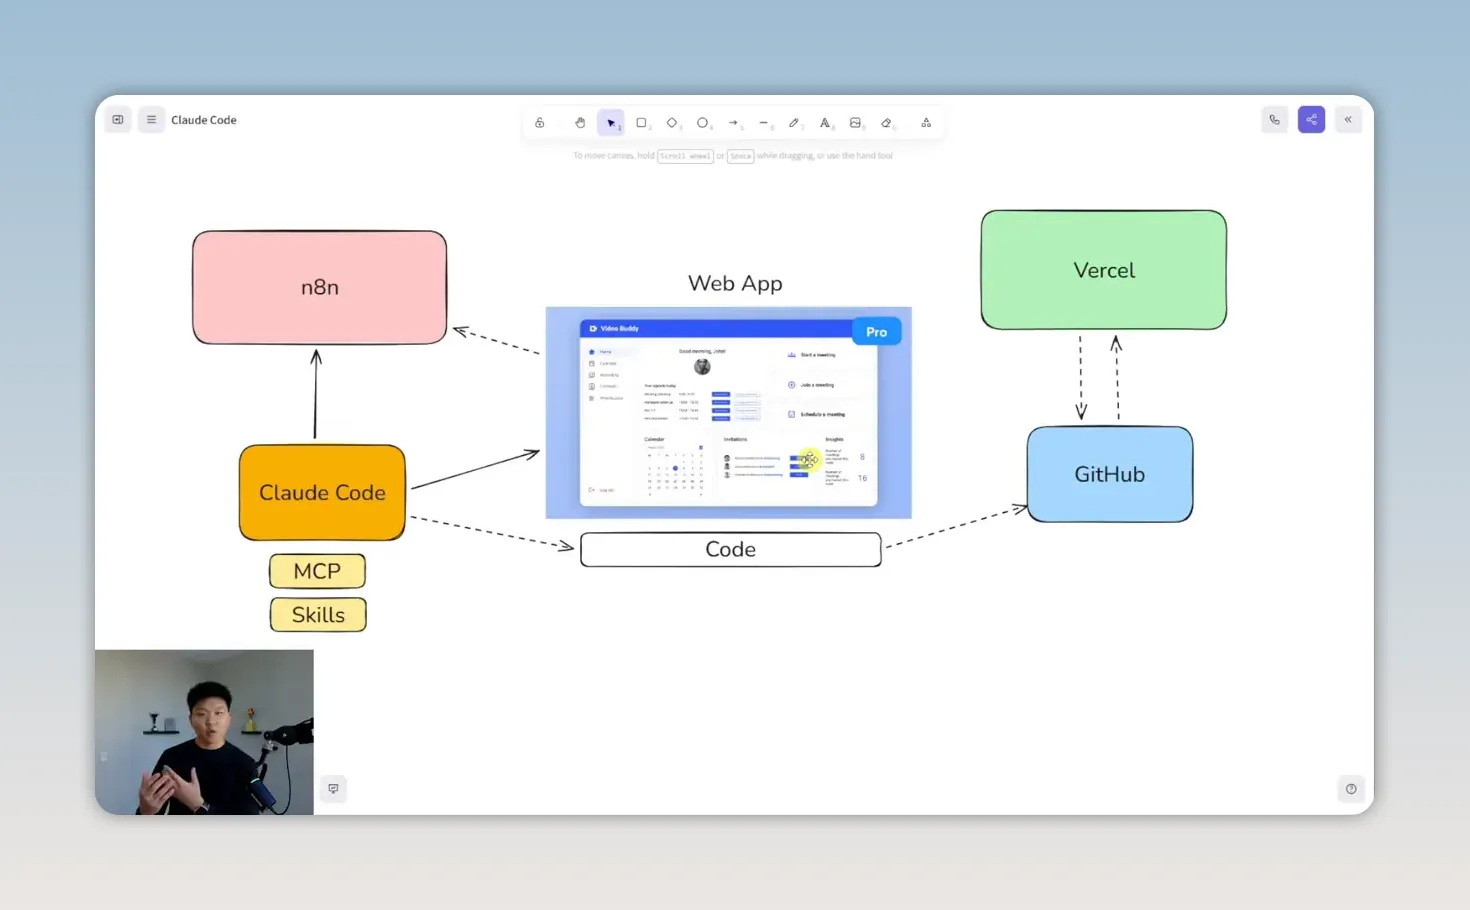
There are really two flows here. During development, you work with Claude Code, push the app code to GitHub, and let Vercel deploy it. When someone uses the deployed app, the app sends a request to n8n and displays the response.
Once that connection is set up, iteration becomes straightforward. Want a different color, a new panel, or another feature? Make the change locally, test it, push it to GitHub, and Vercel can publish the updated version.
Step 1: Set Up Claude Code in VS Code
I like using the Claude Code extension in VS Code because the visual interface feels cleaner and less intimidating than working entirely in a terminal.
- Open VS Code and select Extensions in the left sidebar.
- Search for Claude Code and install the Anthropic extension.
- Follow the sign-in prompt to connect your Claude account.
- Open the File Explorer and choose Open Folder.
- Create or select an empty project folder for your workflow-to-app work.
- Open the Claude Code panel using its extension button.
The File Explorer is where your project files will appear. The Claude Code panel is where you will describe what you want and review its work. You can close extra panels to keep the workspace simple.
You do not need to learn every VS Code button right now. Start with the project folder, the files, and the Claude Code conversation.
Create a CLAUDE.md file for project instructions
Before asking Claude Code to build anything, give it some persistent project guidance. A CLAUDE.md file serves as a standing set of instructions that Claude Code can read when working in the project.
You can create the file yourself, but I prefer asking Claude Code to help write it. The instructions should explain the whole process, not just the website design.
Help me create a concise CLAUDE.md file for a project that turns existing n8n workflows into web apps. First, inspect each workflow and prepare its inputs and outputs for a custom interface. Then build and test the front end locally. Once it works, push the app code to its own GitHub repository for deployment on Vercel. Use the available n8n tools, n8n skills, frontend design skill, and GitHub tools. Ask clarifying questions before writing the file.
For this project, I chose separate GitHub repositories for each app and Tailwind CSS for styling. I let Claude propose the project structure.
If it asks about something you do not understand, ask what the choice means and why it matters. You do not have to pretend to know the terminology.
Use Plan Mode before making big changes
Claude Code offers different permission and working modes. The interface shown in my setup included Ask Before Edits, Edit Automatically, Plan Mode, and Bypass Permissions.
I like Plan Mode when setting up a project or deciding how a feature should work. It gives us a chance to clarify requirements and review the approach before files or workflows change.
For small, well-defined fixes, a direct request is usually enough. For changes that affect the whole app or backend, planning first is worth it.
I used Bypass Permissions repeatedly in the demo to reduce approval prompts. That mode removes an important review step, so it should not be your default just because it is faster. The relevant VS Code setting is labeled Allow Dangerously Skip Permissions. Treat that wording seriously, especially when Claude has access to credentials, repositories, and live workflows.
Step 2: Connect the MCP Servers and Skills
Now we need to give Claude Code the tools and guidance described in the project instructions. These resources serve different purposes:
- n8n MCP server: Provides information about n8n nodes, configurations, and workflow patterns, plus workflow management capabilities when connected to your instance.
- n8n skills: Adds guidance on expressions, workflow construction, coding, and using the n8n tools effectively.
- GitHub MCP server: Gives Claude access to GitHub operations, subject to the permissions you grant.
- Frontend design skill: Helps guide the visual design and implementation of the app.
For my setup, Claude needed my n8n instance URL, an n8n API key, and a GitHub personal access token, alongside the resource links.
Rather than manually copying installation instructions from each repository, I gave Claude Code the links and asked it to read the setup instructions, configure the MCP servers, and install the skills. When it proposed that I run installation commands, I asked whether it could run them itself. In this case, it could.
That is a useful habit: if Claude tells you to do a setup task, ask whether it can handle it. Sometimes you really do need to take an action yourself. Other times, it can complete the task with the tools already available.
Create a GitHub token
In GitHub, the path is Settings → Developer settings → Personal access tokens. Create a fine-grained token and configure it for the repositories and operations you need.
The demo used broad permissions and no expiration for convenience. For your own setup, prefer a limited repository scope, only the required permissions, and an appropriate expiration. GitHub’s personal access token documentation explains the available options.
A token is a credential, not ordinary project content. Keep it out of public repositories and screenshots.
Check what was installed and restart
Claude created an .mcp.json configuration containing the n8n and GitHub server settings. The skills did not appear there because, in this setup, they were installed globally rather than inside the project.
That means a missing skill folder in the File Explorer does not necessarily mean installation failed. Ask Claude to list the installed skills and explain where they live.
After configuring the servers and skills, I closed and reopened VS Code so Claude Code could load the changes.
The slash-command menu is also useful. Typing / exposes commands for things such as changing models, managing MCP servers, working with memory, and clearing a conversation. The exact options depend on your environment and version.
One important warning: an MCP configuration can contain real credentials. A local file is not automatically encrypted, and neither is an ordinary .env file. Keep credential-bearing files out of GitHub and use the appropriate secret-handling setup for your tools.
Step 3: Have Claude Audit and Prepare the n8n Workflow
For the main app, I started with a simple n8n workflow called Fitness Coach. It had a chat trigger and an AI agent prompted to help with exercise, weightlifting, and basic nutrition.
It worked as an internal chat demo, but it was not yet configured for the custom interface we wanted.
I switched to Plan Mode and asked Claude to inspect it:
Find the Fitness Coach workflow in my n8n instance. I want to turn it into a web app. Before building the interface, inspect the workflow and propose the changes needed so a custom front end can send messages and receive responses correctly.
Claude found the workflow through the n8n MCP tools, analyzed it, and asked whether the coach should remember conversation history. The original workflow had no memory, so I added that requirement.
The resulting plan included:
- Replacing the existing chat trigger with a POST webhook for this implementation.
- Adding window buffer memory for conversation history.
- Updating the workflow connections.
- Configuring the agent to read the message from the webhook request.
- Publishing the updated workflow.
During the update, Claude encountered a missing session ID parameter. It identified that the relevant value was nested inside the request body and corrected the expression.
This is a good example of why the workflow audit matters. Adding memory is not just dropping another node onto the canvas. The session key has to match the data the interface actually sends.
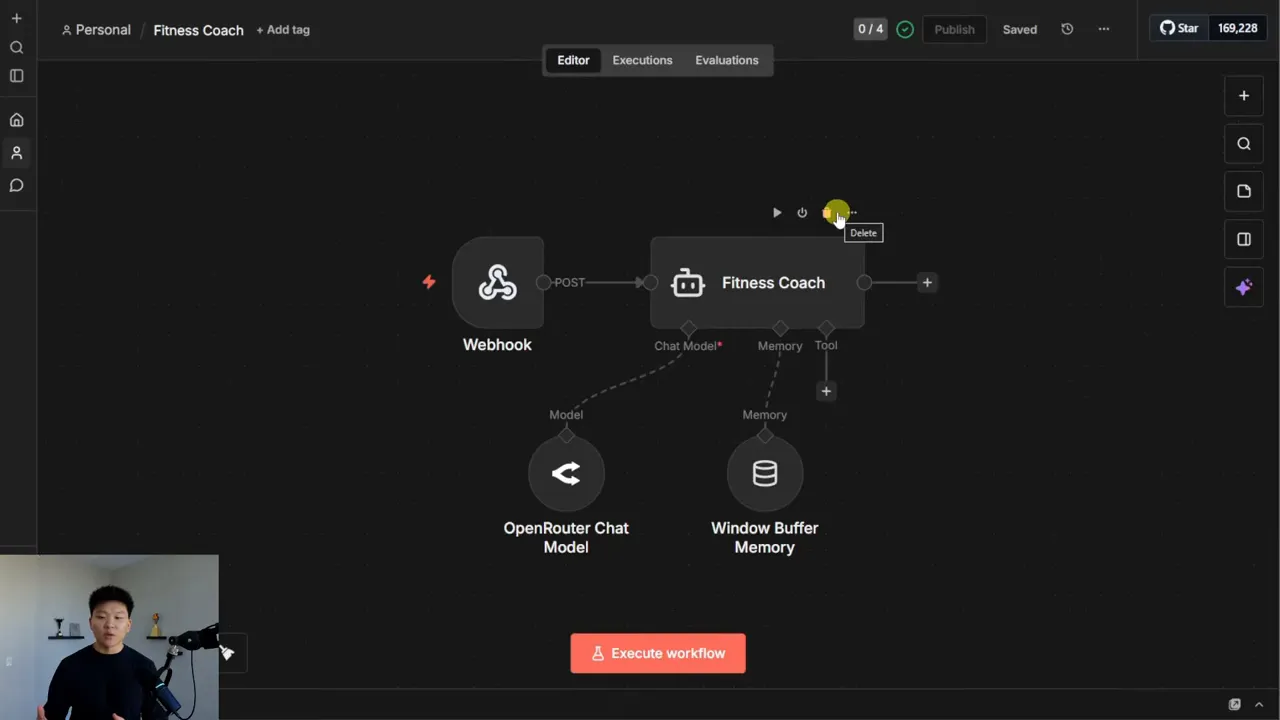
After Claude finished, I refreshed the workflow in n8n and checked the changes. The webhook was configured for POST requests, the memory node was connected, and the agent’s input mapping had changed.
There was no separate Respond to Webhook node. Instead, the webhook was configured to respond when the last node finished. That can work for this flow. What matters is that the response behavior matches what the app expects.
Step 4: Plan and Build the Front End
With the workflow prepared, the next conversation is about the product experience. Do not just ask for “a nice website.” Describe the layout, behavior, style, and features that matter.
For the fitness coach, I wanted a professional, minimal interface rather than something that felt obviously AI-generated. I also wanted a small gamification element to encourage continued use.
Plan a clean, minimal front end for the Fitness Coach workflow using the frontend design skill and available n8n resources. Include a main chat interface and a progress panel that tracks messages and lets people level up. Ask clarifying questions about functionality, styling, mobile layout, and persistence before building.
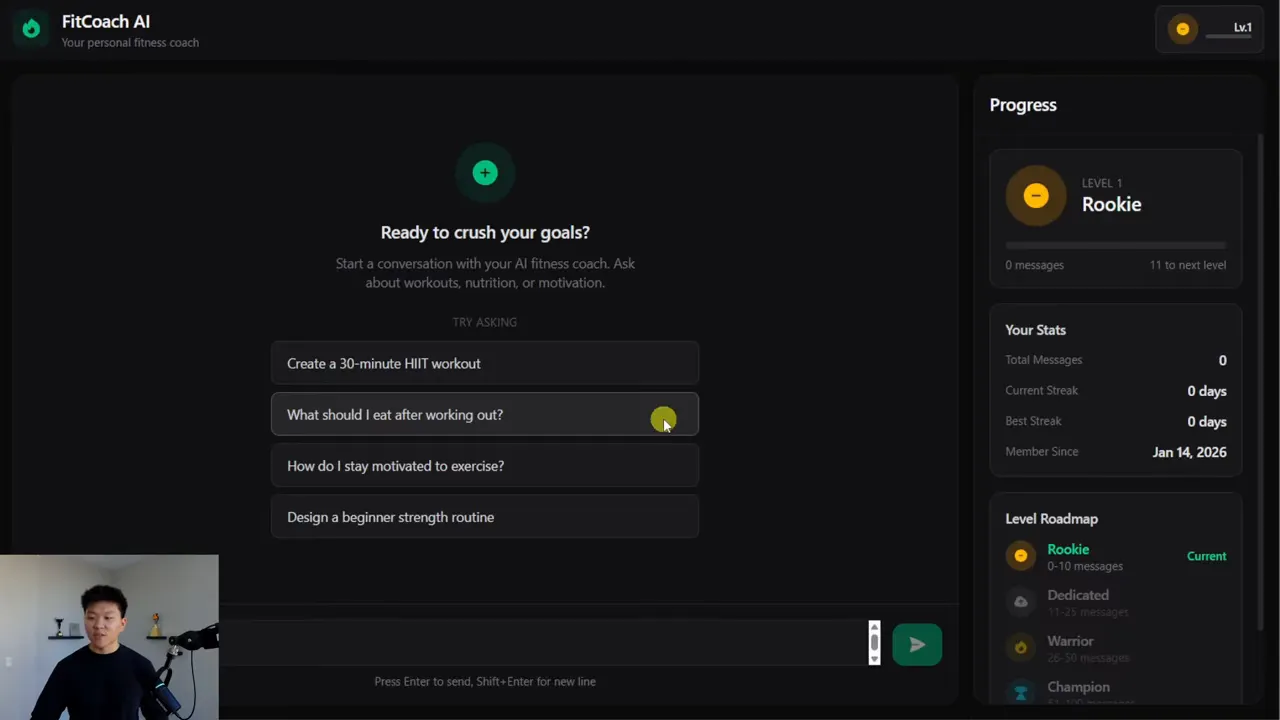
Claude asked about the workflow connection, core features, rewards, data persistence, branding, and mobile behavior. We settled on:
- Name: Fit Coach AI.
- Appearance: A primarily dark interface.
- Main experience: Fitness questions, workout planning, and conversation with the coach.
- Gamification: Message-based points and levels.
- Mobile layout: Keep the progress panel available.
- Persistence: Keep the demo simple and defer database-backed storage and authentication.
That last point is important. A progress panel does not automatically mean you have a complete account system or durable, cross-device user data.
Once I accepted the plan, Claude created a task list and built the app. That list made it easier to see what it was doing and which stage it had reached.
Keep useful conversation context
I cleared the conversation between the backend work and the front-end planning. That gave us a fresh context, but it also meant Claude needed the workflow name or ID again.
CLAUDE.md preserves project instructions. It does not preserve every detail from a conversation you clear. If you are still working on the same app and the previous discussion is useful, keeping that thread can save repetition.
Start on localhost
The first version ran on a localhost address. That is the development version on your computer, not a public app link you can send to someone else.
Use this stage to check that the interface looks right and, more importantly, that it can communicate with n8n.
Step 5: Troubleshoot the Front End and Backend Together
The first build looked promising, but it was not perfect. That is normal. The useful skill is learning how to identify a specific problem, give Claude evidence, and test the correction.
Fix the full JSON response appearing in chat
My first message reached n8n and produced a response. The problem was that the app displayed the entire JSON body, including the field named output, instead of only the assistant’s reply.
I took a screenshot and gave Claude a specific correction:
The request is working, but the chat displays the complete JSON response. Update the front end so it extracts and displays the value of the output field rather than showing the whole response object.
This did not require a new planning session. It was a small display fix. Claude updated the front end, and the next test showed the reply without the JSON wrapper.
Fix the points and message counter
The next issue was on the gamification side. I had sent messages, but the panel still showed zero points.
I described the expected behavior and the observed behavior: successful messages should update progress, but they were not doing so.
Claude changed the local storage handling. That introduced another problem: the local app stopped loading. I sent a screenshot of the error, and Claude simplified the implementation. After refreshing, the app loaded again, and a new successful exchange increased the message count.
The lesson is not that every fix works immediately. It is that you should retest after each change, including the parts that were already working.
Change the agent’s writing style in n8n
The coach was also responding with Markdown formatting and bold markers. For this app, I wanted natural-language paragraphs.
That was a backend instruction change, so I asked Claude to update the AI agent’s system prompt in n8n rather than only changing the interface.
Claude made the edit, and I checked that the workflow had been saved and was still published. An immediate test still included some formatting, so the result needed another pass. In the later deployed test, the response was much closer to the requested style. It was not clear whether the earlier issue was prompt specificity or the published workflow version.
That distinction matters: a successful edit is not proof of the desired behavior. Check the actual output.
Before moving on, test these together:
- Messages reach the correct n8n workflow.
- The interface displays only the intended response content.
- The conversation retains the context you expect.
- Points and message counts update correctly.
- The app still loads after a refresh.
- The active workflow uses the intended agent instructions.
Step 6: Push the App Code to GitHub
Once the local app is working, create a repository for its code.
- In GitHub, choose New repository.
- Give it a name, such as
fit-coach-ai-app. - Choose the appropriate visibility.
- Create the repository and copy its URL.
- Give Claude Code the URL and ask it to push the app code.
I used an empty public repository for the demo, without adding a README or other initial files in GitHub. Public visibility is not a requirement for the architecture.
After Claude pushed the code, I refreshed GitHub and confirmed the app files were present.
Before publishing, check exactly what is being committed. App source files belong in the repository. API keys, GitHub tokens, and credential-bearing MCP configuration files do not.
Claude also noted that the deployed app would need an environment variable for the n8n webhook URL. That detail becomes important in the next step.
Step 7: Deploy with Vercel and Test the Live Connection
In Vercel, create a new project and import the GitHub repository:
- Select Add New → Project.
- Find the app’s GitHub repository and choose Import.
- Review the project configuration.
- Add the environment variables the app expects.
- Deploy and open the assigned public domain.
Vercel’s GitHub integration documentation provides more detail on how repository changes trigger deployments.
The first deployment of my app loaded successfully, but sending a message produced a server configuration error.
Here is the useful diagnostic step: I checked n8n’s executions and found no new execution for that message. The interface was online, and n8n was online, but the request was not reaching the workflow.
The missing piece was the webhook environment variable that Claude had already told me to configure.
Configure the webhook environment variable
In Vercel, open the project’s Settings → Environment Variables. Add the exact variable name expected by the code, with the workflow’s production webhook URL as its value, and redeploy as needed.
Do not guess the name. Ask Claude which variable the generated app reads. Vercel’s environment variable documentation explains configuration and deployment scope.
For the demo, I instead asked Claude to hardcode the webhook URL so I could also demonstrate the update pipeline. It changed the code, pushed another commit to GitHub, and Vercel rebuilt the app automatically.
That shortcut made the connection work, but it also exposed the webhook URL in the public repository. Use server-side configuration for a real app rather than treating the demo shortcut as the recommended setup.
After the redeployment, I asked the coach to design a beginner strength routine. The app returned a response, and n8n showed a new execution containing that exact request. That confirmed the connection all the way through.
Run a Security Review Before Sharing the App
A working public app can spend real money. If someone can repeatedly trigger your workflow, those requests may consume n8n resources and paid AI model usage under your credentials.
I asked Claude Code to review the files pushed to GitHub and identify exposed credentials or other risks. It flagged the hardcoded webhook URL and discussed the credentials in my local MCP configuration.
Those are different situations:
- A webhook URL committed to a public repository is publicly accessible information. Without backend protection, someone may call it directly.
- Credentials in a local configuration file are not automatically published with the app, but they still need careful handling.
- An environment variable separates configuration from source code, but it does not replace authentication or protect an endpoint by itself.
In my project, the MCP credentials had not been included in the GitHub repository. That reduced the particular exposure Claude was concerned about. It did not mean local files are inherently secure in every circumstance.
Before sharing your own app, check:
- Whether credential files are excluded from version control.
- Whether any secrets appeared in commits, screenshots, or shared files.
- Whether the webhook has appropriate authentication and abuse protection.
- Whether the deployed app uses the correct server-side configuration.
- Whether n8n is running the intended published workflow version.
If credentials have been exposed, rotate them. Use Claude’s security review as another check, not as a guarantee that an app is secure.
Keep Improving the App Without Rebuilding the Setup
The fitness coach itself is simple. The more useful result is the development loop you now have:
- Describe a change to Claude Code.
- Update the front end, the n8n workflow, or both.
- Test locally and inspect workflow executions.
- Push the app code to GitHub.
- Let Vercel deploy the new version.
- Test the public app again.
From there, the fitness coach could grow to include progress photo uploads, a food logger, a workout logger, or additional backend workflows. Those are possible next features, not capabilities already completed in this demo.
You can also reuse the setup for another app. The project guidance, configured MCP servers, and globally installed skills reduce the amount of repeated setup. Keep each app’s files organized and use the separate-repository strategy if that is what you chose.
Add a custom domain when you are ready
Vercel assigns a default domain ending in vercel.app. You can later buy a domain through Vercel or connect one purchased elsewhere.
For an existing domain, follow the DNS instructions Vercel provides for that domain and your registrar. The required record changes depend on the configuration. If the terminology is unfamiliar, ask Claude to explain the instructions step by step.
Start with the Claude plan you need
You can start with Claude Pro when it includes Claude Code access for your account, though longer building sessions may reach its usage limits.
My approach is to start there and upgrade only when actual usage justifies it. The higher-usage options discussed for this build were $100 and $200 per month. Plan details and pricing can change, so confirm the current options before deciding.
A higher tier can be good value if you use it heavily, but there is no reason to pay for capacity you do not need. Upgrade when you hit a real constraint, and downgrade if the extra capacity is not useful.
The Real Skill Is Directing the Whole Build
The biggest shift here is not that Claude Code can make a chat interface. It is that you can use one conversation-driven environment to work across the app and the automation behind it.
We started with an existing workflow, prepared its inputs and outputs, built a front end, corrected response handling, repaired progress tracking, changed the backend prompt, and deployed the app through GitHub and Vercel.
You do not have to know every implementation detail on day one. But you should keep asking what changed, why it changed, and how to verify it. Clear requirements and concrete test results make the whole process better.
Start with one workflow and one useful interface. Get the complete loop working. Once you understand how the pieces connect, you can keep adding functionality without starting over.


