An AI personal assistant gets a lot more interesting when it can actually do things: schedule a meeting, find someone’s email address, reply in the right email thread, or research a topic and put a finished article into a draft.
That’s what I built in n8n. Instead of giving one agent every tool and an enormous prompt, I gave a central assistant access to four specialized agents. Each handles a specific area, while the main assistant figures out who needs to do what.
The really cool part is how these agents work together. A single Telegram voice message can trigger a contact lookup, a calendar action, and an email, then return a confirmation to the same chat. And the whole build uses visual workflows rather than custom application code.
What You'll Learn
- A central assistant delegates tasks to specialized email, calendar, contact, and content agents.
- Telegram voice and text requests share one normalized input field before reaching the assistant.
- Reliable tool actions depend on retrieving contact details and record IDs before making changes.
- Workflow tools and AI-filled parameters connect specialized agents without custom application code.
Table of Contents
- A Central Assistant With Four Specialized Agents
- What This AI Personal Assistant Can Actually Do
- Handle Telegram Voice and Text With One Input Format
- Keep the Main Assistant’s Prompt Focused on Delegation
- Connect the Agents With Workflows as Tools
- Build the Email Agent Around Tool Dependencies
- Use $fromAI to Fill Tool Parameters
- Build the Calendar Agent With Separate Creation Tools
- Use the Contact Agent as the Shared Address Book
- Create Researched HTML Content With Tavily
- Get the Free n8n Workflow Templates
- The Real Win Is a System You Can Keep Extending
A Central Assistant With Four Specialized Agents
The architecture starts with one central assistant. Its job is delegation, not doing every task itself.
- Email agent: Sends emails, replies to messages, creates drafts, retrieves emails and labels, applies labels, and marks messages as unread.
- Calendar agent: Creates solo events or events with attendees, retrieves events, updates them, and deletes them.
- Contact agent: Looks up contacts and adds or updates records in an Airtable contact database.
- Content creator agent: Searches the web and writes structured blog posts in HTML.
The central assistant also has direct access to Tavily for general web searches. That means a simple research request does not have to go through the blog-writing agent.
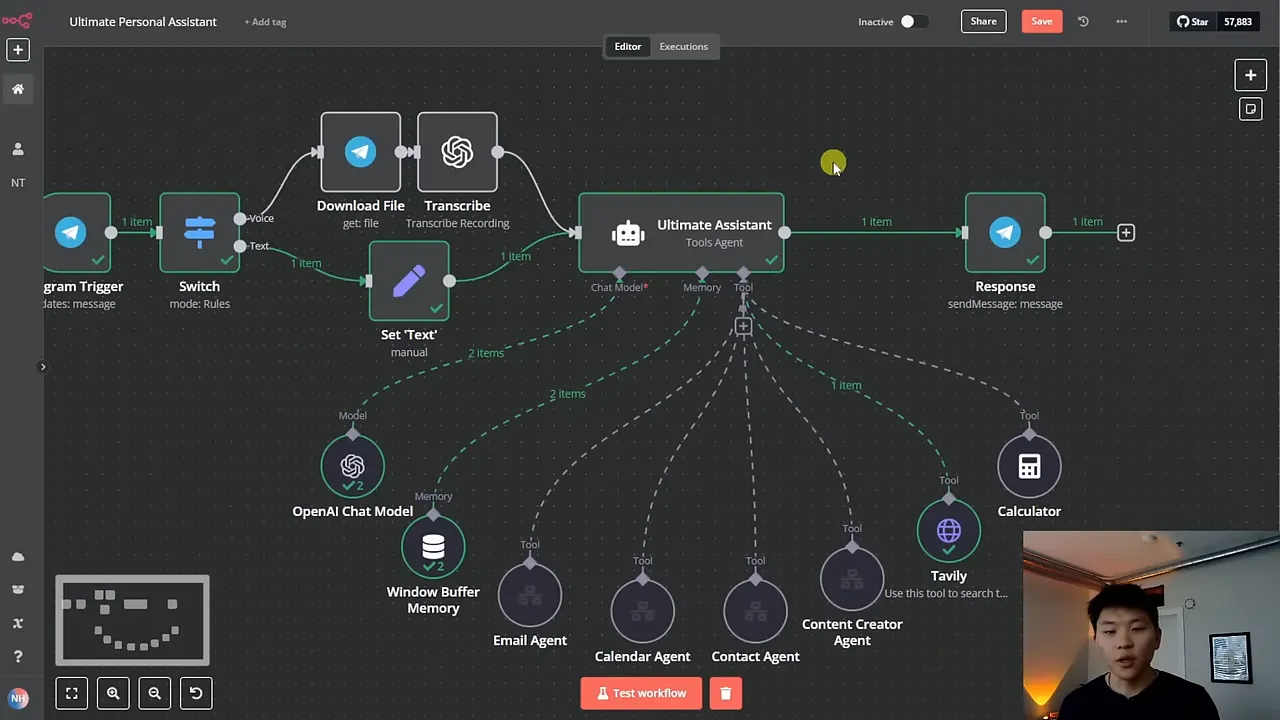
In this build, I’m using GPT-4o for the main assistant and the email, calendar, and contact agents. The content creator uses Claude 3.5 Sonnet because I like how it structures readable content and HTML.
The important design choice is specialization. The main assistant doesn’t need to understand every Gmail parameter or calendar operation. It needs to recognize the task, collect any prerequisites, and pass a useful query to the right agent.
What This AI Personal Assistant Can Actually Do
Schedule a meeting and send a confirmation email
For the first test, I asked the assistant to schedule a team sync with Nate Herkelman for 6 p.m. and email him to confirm whether the time worked.
That request requires more than just creating an event:
- The contact agent retrieves Nate’s email address.
- The calendar agent creates the team sync and adds him as a guest.
- The email agent sends a message asking whether 6 p.m. works.
- The central assistant returns a Telegram confirmation with an event link.
Once the contact information is available, the calendar and email actions can proceed without another lookup. The result is both a calendar invitation and a separate confirmation email from one request.
Reschedule using conversation memory
Next, I asked it to move the team sync back an hour. I didn’t repeat the attendee or the original meeting details.
Because the central assistant has memory, it can connect the follow-up request to the meeting we just created. It moved the event from 6 p.m. to 7 p.m. and sent Nate an email about the new time.
That second email is an interesting detail: I didn’t explicitly request another notification in the follow-up. In this test, the assistant carried that context forward and sent it anyway.
Reply in an existing email thread
I also asked it to respond to a recent email from Nate and say that I was doing well. The assistant used the email reply tool, so the response appeared in the existing conversation rather than as a new, unrelated email.
Behind that simple request is an important dependency: the email agent first retrieves the relevant message, gets its message ID, and passes that ID into the reply tool. The agent is doing the lookup needed to take the action correctly.
Apply a Gmail label
Labeling a recent email as high priority requires two lookups instead of one. The email agent needs the message ID for the email and the label ID for the high-priority label.
It retrieves the email, retrieves the available labels, and then supplies both IDs to the labeling tool. This is exactly the kind of small, multistep task that makes specialized agents useful.
Research a blog and put it into an email draft
For another test, I asked for a blog about DeepSeek and requested that it be placed into a draft addressed to Nate.
The content creator researched the topic and wrote the article. The contact agent retrieved the recipient’s address, and the email agent created the draft.
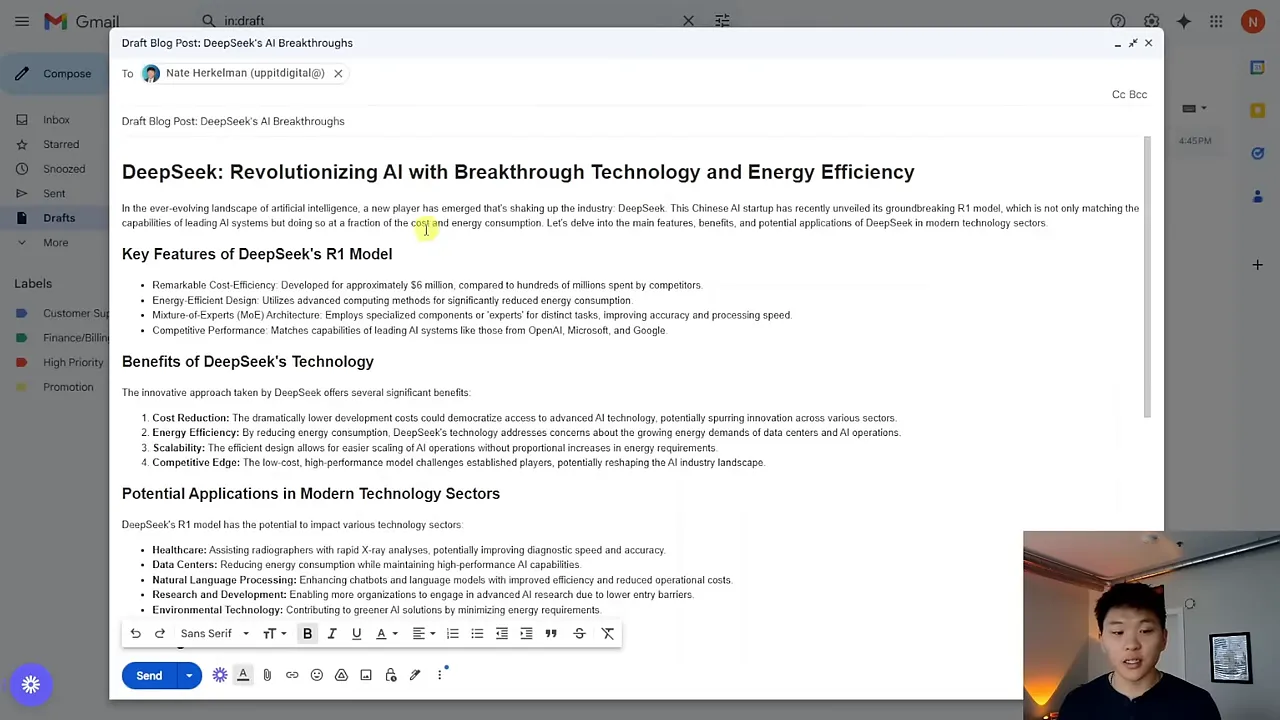
The resulting draft contained rendered HTML with headings, bullet points, benefits, potential applications, challenges, and source links. It stayed in drafts, which was the requested action, rather than being sent.
Email calendar availability
Finally, I asked the assistant to get my availability for the day and email it to Nate. The calendar contained three meetings:
- 12 p.m. to 1 p.m.: A meeting with Nate.
- 7 p.m. to 8 p.m.: The rescheduled team sync.
- 8 p.m. to 9 p.m.: A strategy meeting.
The email listed those busy periods, included links to the events, and identified the open time: before noon, between 1 p.m. and 7 p.m., and after 9 p.m.
That request brought together calendar retrieval, contact lookup, and email composition without requiring me to copy information between apps.
Handle Telegram Voice and Text With One Input Format
The main workflow starts with a Telegram Trigger. Incoming messages take one of two paths, depending on whether they contain a voice message or text.
The voice path
- A Switch node checks whether a voice file exists.
- A Telegram node downloads the audio file.
- A transcription node converts the audio to text.
- The resulting
textfield goes into the central assistant.
The text path
For a typed message, the Switch checks whether message.text exists. A Set node maps that message into a field named text.
This normalization is small but really useful. Both branches produce the same field, so the agent can read $json.text regardless of how the request arrived.
I tested the text route with a web search for puppies. The assistant called its search tool and returned a short collection of stories with links. The input format changed, but the assistant’s behavior didn’t need a separate implementation.
For the output, the workflow takes the chat ID from the original Telegram Trigger and sends the assistant’s response back to that same chat.
Keep the Main Assistant’s Prompt Focused on Delegation
One of my favorite things about this framework is how short the prompts can stay. The main assistant isn’t responsible for writing emails or assembling calendar event summaries. Those responsibilities belong to its specialists.
Its instructions cover five main points:
- Role: Route the user’s request to the correct tool.
- Tools: Explain when to use the email, calendar, contact, content, and web-search tools.
- Dependencies: Retrieve contact information before actions that require it.
- Example: Demonstrate a contact lookup followed by an email request.
- Time context: Supply the current date and time.
The contact rule matters. When sending an email, creating a draft, or creating a calendar event with an attendee, the assistant first gets the contact information and passes it to the agent that needs it.
For example, if the request is to email Nate about what time he wants to leave, the main assistant first asks the contact agent for his address. It then sends the email agent a task description containing that address and the purpose of the email.
It passes an instruction, not a fully composed email. The email agent owns the writing and sending process. That keeps the division of responsibility clear.
The date and time context also gives relative requests, such as scheduling something tonight, a reference point.
Connect the Agents With Workflows as Tools
Each specialist lives in its own n8n workflow. To make those workflows available to the central assistant, I add them through Call n8n Workflow Tool.
- Open the central agent’s tool connections and add the workflow tool.
- Give it a name that matches the name used in the system prompt.
- Write a concise description of when the assistant should call it.
- Choose the workflow from the database-backed workflow selector.
- Make sure the selected workflow begins with an Execute Workflow Trigger.
The actual tool name matters more than the display label on the canvas. In my setup, the names referenced by the prompt use camel case, so I define the tool names consistently.
For the email agent, a description explaining that it handles email actions is enough to establish its purpose. The detailed email instructions remain inside the email workflow.
n8n’s workflow tool documentation provides additional reference for this connection.
Return a clear result from the last node
The called workflow needs to return information so the main assistant knows what happened. In the configuration used here, the workflow tool reads the result from the last node.
I use a final Set node with a field named response. That naming comes from an older version of the tool configuration, which exposed a return-field setting. The key idea is to make the terminal output clear and useful.
A successful email action can return a confirmation of what was sent. A failed action can return a message explaining that the task could not be completed and should be attempted again.
Create success and error branches
Inside the specialist agent’s settings, I set On Error to Continue using error output. This creates separate success and error paths.
- Success: Return the specialist agent’s output to the central assistant.
- Error: Return a short failure message asking it to try again.
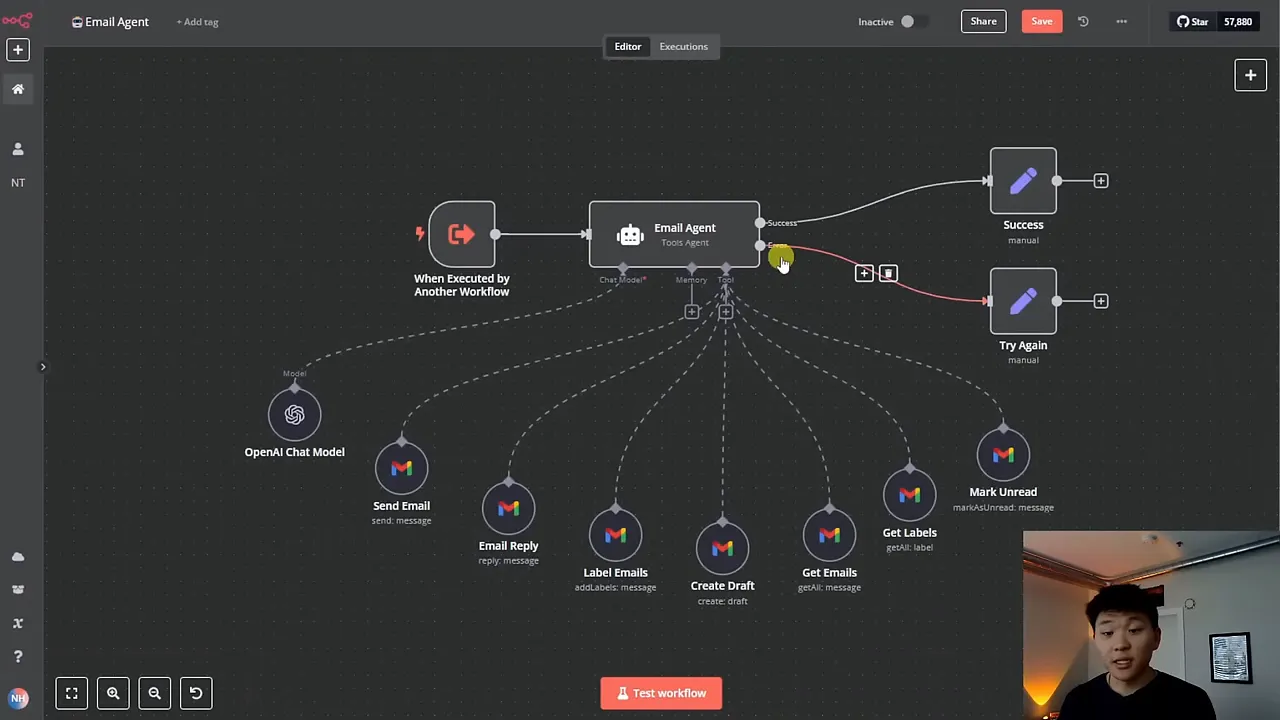
This gives the agents a way to communicate problems, not just results. The main assistant can read the failure response and may send a revised query to try the task again. It is a feedback mechanism, not a guarantee that every failure will recover automatically.
Build the Email Agent Around Tool Dependencies
The email agent’s prompt is concise: it manages email, formats outgoing messages professionally in HTML, and signs them as Nate.
Most tool descriptions are straightforward. Send Email sends an email. Create Draft creates a draft. Get Emails retrieves messages. Get Labels retrieves available labels.
The extra instructions focus on operations that require IDs:
- Reply to an email: Retrieve the email first, then use its message ID in the reply tool.
- Mark an email unread: Retrieve the email first, then pass its message ID to the unread tool.
- Label an email: Retrieve the email and labels first, then provide the message ID and label ID.
That’s the pattern: retrieve the record, obtain its identifier, then perform the action. The user can describe a message naturally, but the underlying integration still needs an exact ID.
Test the specialist without the whole system
When configuring tools, I put a sample query into the workflow trigger’s test data. That lets me run the email agent directly instead of sending every test through Telegram and the main assistant.
One test asked it to email a supplied address, ask what was new, and ask the recipient’s favorite color. Because the address was already included, the email agent only needed its Send Email tool.
This makes it much easier to inspect whether the specialist selected the right tool and supplied the expected values.
Use $fromAI to Fill Tool Parameters
The function that makes tool configuration especially convenient is $fromAI(). It allows the model to populate tool parameters from the task it receives.
For Send Email, I use AI-filled fields for:
- Recipient: The destination email address.
- Subject: A subject appropriate to the request.
- Message: The HTML email body.
In this example, the keys alone provided enough context for the model to fill those fields. Descriptions can provide more guidance when a parameter needs clarification.
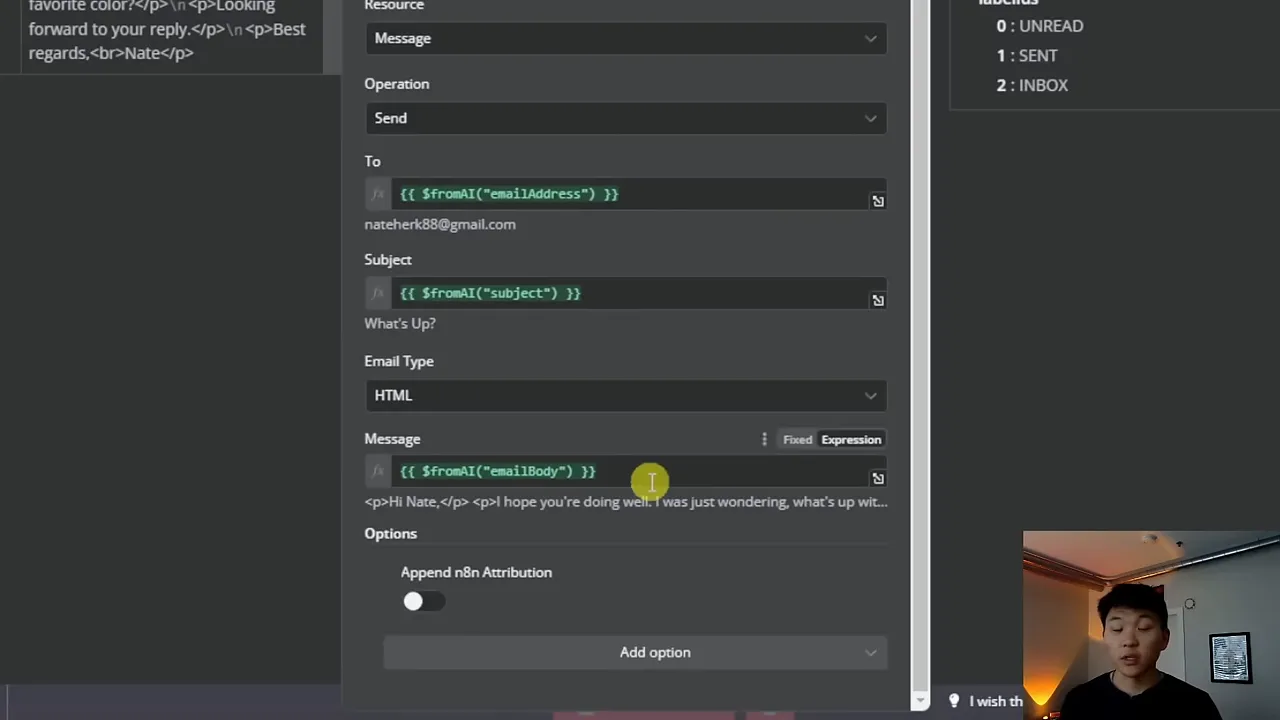
For the favorite-color test, the model extracted the supplied address, generated a subject, and wrote an HTML message that covered both questions.
Without this approach, I would need additional logic to extract the recipient, subject, and message from the incoming request. Here, the model fills those parameters directly inside the tool configuration. The n8n $fromAI reference explains the function in more detail.
Use retrieved values, not invented identifiers
AI-filled parameters also work for IDs, but the agent still needs to retrieve the correct value first.
When I tested marking Nate’s recent email as unread, the agent searched for his messages and retrieved the most recent one. The sender filter could use either the sender name or the actual email address. It then passed the returned message ID into Mark Unread.
The useful distinction is that the model selects and transfers an identifier returned by a tool. It does not need to guess what the identifier should be.
Build the Calendar Agent With Separate Creation Tools
The calendar agent follows the same overall structure: a workflow trigger, a focused AI agent, calendar tools, and success or retry responses.
It has five tools:
- Create an event without attendees.
- Create an event with an attendee.
- Get events.
- Update an event.
- Delete an event.
The prompt explains which creation tool to choose and requires the agent to retrieve events before updating or deleting them. Those actions need the event ID, just as email replies need a message ID.
I also give it the current date and time and set a default duration: if no duration is specified, assume the event lasts one hour.
Why use two event-creation tools?
In this configuration, the attendee-enabled tool includes an attendees parameter. Trying to use that tool for a solo event while leaving the attendee value empty caused the request to fail.
Rather than forcing one tool to handle both cases, I separated them. If someone needs an invitation, the agent uses the attendee tool. Otherwise, it uses the basic creation tool.
This is a simple example of shaping tools around the integration’s requirements so the agent has a clear choice.
Delete an event by looking it up first
To test deletion, I asked the assistant to cancel the team sync at 7 p.m. The calendar agent retrieved the event, obtained its ID, and deleted it. The central assistant then confirmed the cancellation in Telegram.
The lookup-and-act pattern is the same one used throughout the email agent. Once that pattern makes sense, the other tools become much easier to configure.
Use the Contact Agent as the Shared Address Book
The contact agent is the simplest specialist. It has two tools connected to Airtable:
- Get Contacts: Retrieve contact information.
- Add or Update Contacts: Create a contact or update an existing record.
Its prompt defines those responsibilities and explains the tools. It doesn’t need instructions about email composition or calendar scheduling because those tasks belong elsewhere.
Most of the earlier examples already tested contact retrieval, so I tested an update instead: changing Michael Scott’s email from michaelscott@dundermifflin.com to michael@dundermifflin.com.
The request went to the contact agent, and the Airtable record updated. Future contact lookups can then retrieve the revised address.
That shared address book keeps the main assistant from having to carry contact-management logic inside every email or calendar request.
Create Researched HTML Content With Tavily
The content creator has one main tool: Tavily search. Its prompt defines it as a blog writer responsible for engaging, informative, well-structured content.
The requirements include:
- Research the requested topic using web search.
- Format the article in HTML.
- Use clear headings and readable structure.
- Preserve source links so the reader can open the underlying material.
That is how the DeepSeek draft gets its structure and source section. The content agent returns the article, and the email agent handles putting it into a draft for the correct recipient.
Let the model populate the search request
The Tavily tool sends a POST request with a JSON body. In this setup, I use a placeholder named searchTerm for the part the model needs to fill.
The placeholder is defined as a string, with a description tying it to the topic the user requested. When the tool runs, the model supplies the actual search phrase.
For the DeepSeek example, it expanded the topic into a query covering AI features, benefits, and applications in modern technology sectors.
This works similarly to $fromAI(): define the dynamic field, explain what it represents, and let the model provide the value. The tool configuration uses placeholders rather than the same function syntax.
The output doesn’t have to stop at email
Email drafts are just one destination. The same content workflow could connect to social platforms or push articles into Airtable or another database.
That gives you the option to build a content queue for manual publishing or connect the stored output to another workflow. The research and writing specialist can stay focused while the destination changes.
Get the Free n8n Workflow Templates
I’ve made the central assistant and all four specialist workflows available as downloadable JSON files in my free AI Automation Society community.
Inside the community, open YouTube Resources and find the resource post for this build. Download the files and import them into your n8n environment to use as the starting point.
For a more hands-on learning environment, my AI Automation Society Plus community also includes deeper classroom resources on topics such as AI agents and vector databases, shared builds, and live support calls.
The Real Win Is a System You Can Keep Extending
The impressive part isn’t just that an agent can send an email or create an event. It’s that one request can move through several specialized workflows, gather the required information, take action, and return a useful result.
Each agent has a narrow job. Each tool has a clear purpose. The prompts stay short because they explain responsibilities and dependencies rather than trying to describe an entire assistant in one place.
That’s what makes this framework exciting to build on. You can add capabilities to a specialist or connect another agent to the main assistant without putting every tool and every instruction into one overloaded workflow.


