An AI marketing assistant gets a lot more useful when it can actually do things. Not just suggest a LinkedIn post, but research it, write it, create a matching graphic, send everything back to you, and save the results so you can find or edit them later.
That is what I built in n8n: one main marketing agent connected to six specialized workflow tools. I can send it a text or voice message in Telegram and ask for images, image edits, blog articles, LinkedIn posts, or short videos with sound effects.
The interface is simple. Behind it, the system handles prompts, API requests, file conversions, storage, and logging. It is not perfect, especially around long-running video jobs, but it is a useful starting point for building your own AI-powered content production system without writing a custom application.
What You'll Learn
- One central n8n agent routes Telegram requests to six specialized content production workflows.
- Google Drive file storage and a Sheets log make generated images retrievable and editable.
- Blog and LinkedIn workflows combine web research, audience-specific writing, and matching graphic generation.
- Video generation combines four animated scenes with sound effects, but needs careful handling of asynchronous jobs.
Table of Contents
- What This AI Marketing Team Can Do
- How the Main Marketing Agent Works
- The Create Image Workflow
- The Edit Image Workflow
- The Search Images Workflow
- The Blog Post and LinkedIn Workflows
- The Video Generation Workflow
- What It Costs to Run
- How to Set Up the Free n8n Template
- The Most Useful Part Is the Architecture
What This AI Marketing Team Can Do
The main agent has six content tools:
- Create an image: Turn a short request into a detailed image prompt and generate the image.
- Edit an image: Retrieve an existing image and modify it based on a follow-up instruction.
- Search images: Find an earlier asset and either send it back or retrieve its ID for editing.
- Create a blog post: Research a topic, write an article with sources, and generate a related graphic.
- Create a LinkedIn post: Use a similar research and creation process with platform-specific writing and visuals.
- Create a video: Generate four scenes, animate them, add sound effects, and render a finished short.
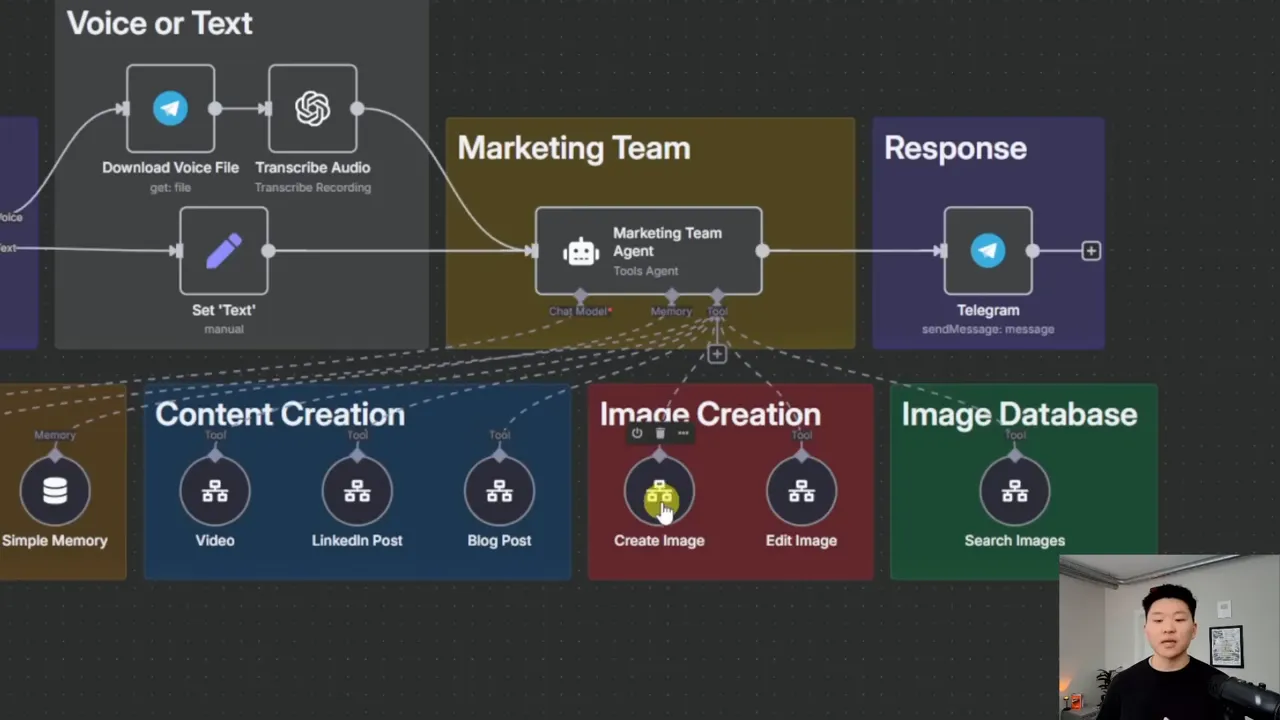
There are seven n8n workflows in total: the main agent and its six tools. Some tool workflows also contain specialized AI agents for writing, image prompting, retrieval, or sound design. So “one agent” means one central assistant you interact with, not one model call doing every task.
A few practical examples
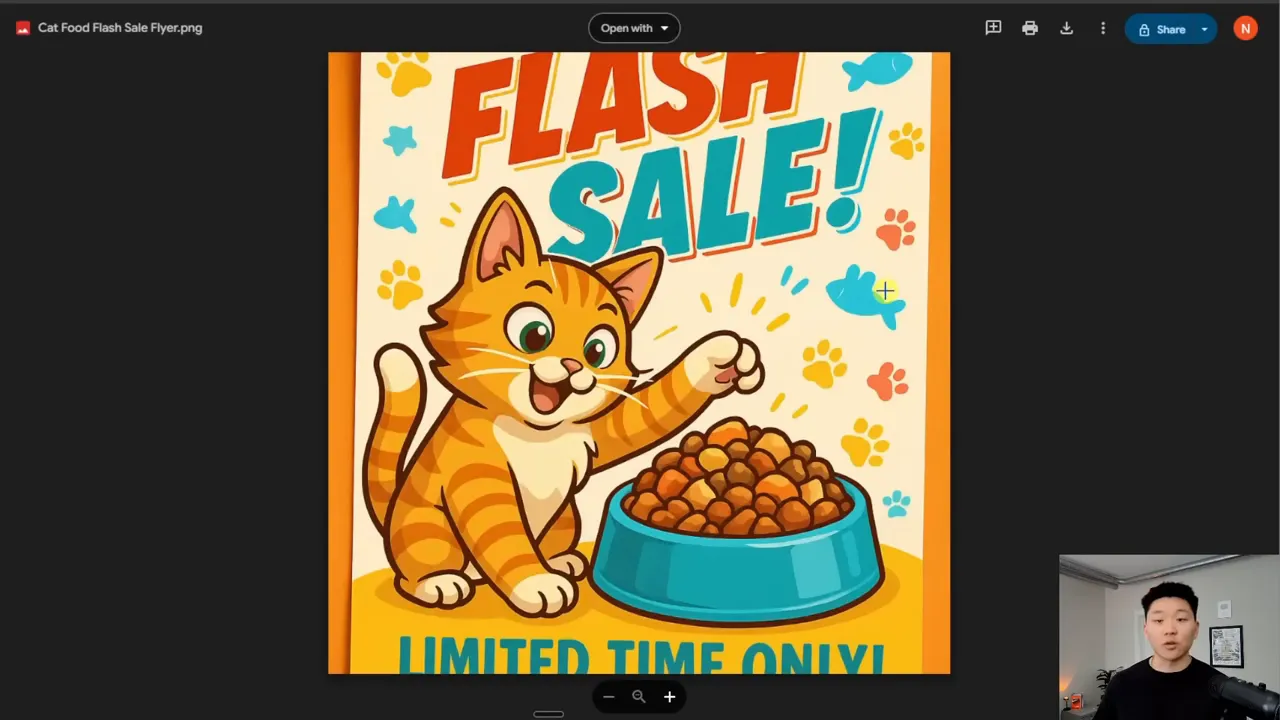
For the first test, I sent a voice message asking for a cat food flash-sale flyer. The system transcribed the audio, routed the request to the image creation tool, and returned an illustrated flyer in Telegram. It also uploaded the image to Google Drive and added a record to a Google Sheets log.
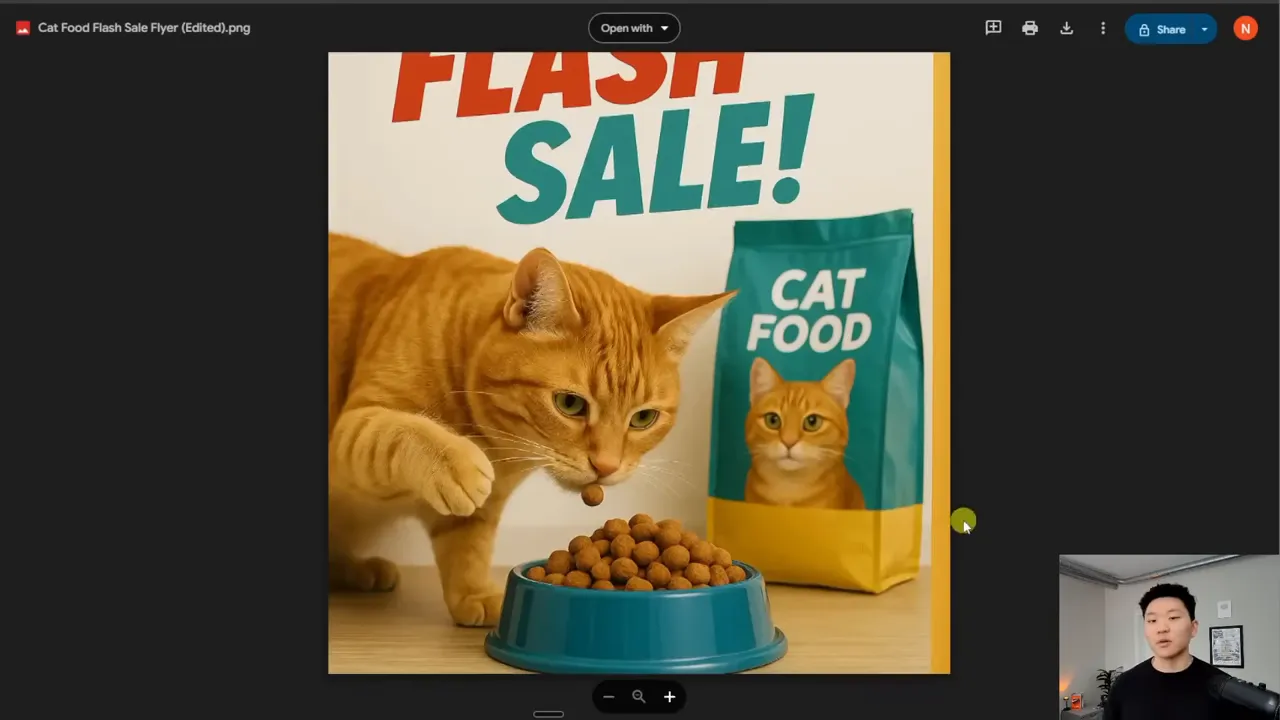
Then I asked it to make that image more realistic. I did not need to paste a file ID or upload the image again. The agent searched the database, found the correct asset, and sent it to the editing workflow. The new version featured a more realistic orange cat eating cat food.
Image creation and editing each took roughly a minute in my tests.
Next, I requested a blog article about the effect of sleep on productivity. The workflow returned an article with references plus a matching graphic. Finally, I asked for a video of a beaver building a house. That produced a four-scene short with background sound effects.
The beaver example also exposed the limits. Some scenes leaned more toward building a dam, and the character did not look exactly the same across all four clips. The system can assemble the content, but prompt quality and visual consistency still matter.
How the Main Marketing Agent Works
The main workflow has a straightforward job: understand the request, choose the right tool, pass the right inputs, and respond through Telegram.
Standardize voice and text into one input
Telegram can deliver either a typed message or a voice message. The voice branch transcribes the audio, and both branches are standardized into a field called text.
The agent reads that field using $json.text. This means the rest of the workflow does not need separate logic for spoken and typed requests. Once the input reaches the agent, both look like text.
Keep the system prompt simple and explicit
I give the agent an overview of its role, then explain which tools it has and when to use each one. The tool descriptions do not need to be complicated. The important part is making the boundaries clear.
For example, the editing instructions explain that a request such as “make that more realistic” means edit an existing image, even though the user did not use the word “edit.”
A few other instructions make the experience much smoother:
- Resolve references to the last image. When I say “edit that image,” the agent should use the latest relevant image from memory or retrieve it from the database.
- Avoid duplicate content delivery. The blog and LinkedIn workflows send their own content to Telegram, so the main agent should only send a short acknowledgment afterward.
- Return clickable links. Saved assets should be easy to open directly from Telegram.
The main agent also has a Think tool available to help it work through tool use. The heavy lifting, though, happens inside the six content workflows.
Give each subworkflow a defined input contract
Each tool starts with n8n’s When Executed by Another Workflow trigger. Rather than accepting arbitrary data, I define the fields that workflow needs.
Those fields then appear in the main agent’s workflow tool configuration. The model can fill in creative inputs, such as a topic or image prompt, while operational values come directly from the original trigger.
The Telegram chat ID is a good example. I pass it dynamically from the Telegram trigger instead of asking the model to invent it. Every tool can then send its result back to the correct conversation.
If you are new to this pattern, the n8n subworkflow documentation explains how parent workflows and child workflows exchange data.
The Create Image Workflow
The image creation tool receives three inputs:
- Image title: A short name, no more than four words.
- Image prompt: The image requested by the user.
- Telegram chat ID: The destination for the finished image.
From there, it follows a repeatable sequence.
1. Expand the request into a useful image prompt
A dedicated image prompt agent takes the original request and adds visual detail. Its instructions cover the main subject, background, style, and other relevant elements.
For the cat food sale, the short request became a much more descriptive flyer concept aimed at pet owners. This separates understanding the user’s intent from instructing the image model.
2. Generate the image through OpenAI
An HTTP Request node sends that expanded prompt to OpenAI’s image generation endpoint. In this build, I used gpt-image-1.
The response contains a large Base64-encoded image string. That is image data represented as text, not yet a binary file that the downstream nodes can send or upload.
A Convert to File node converts that value into binary data and places it in a field called data. At that point, n8n can treat it as an actual image.
The OpenAI image generation guide provides additional context on image generation, editing, and response formats.
3. Send the image and save it
After conversion, the workflow branches. One branch sends the binary image to Telegram using the chat ID passed into the trigger. The other uploads it to a selected Google Drive folder, using the supplied title with a .png extension.
Then it appends a row to the marketing team log in Google Sheets.
The log contains these columns:
- Title: The asset’s name.
- Type: For example, image, edit, or post.
- Request: The prompt or instruction used.
- ID: The Google Drive file ID needed for later retrieval or editing.
- Link: The Google Drive web view link.
- Post: Written content, when applicable.
For a standalone image, the Post field stays blank. The file ID and link are especially important: one lets the workflow work with the file, and the other lets me open it.
The Edit Image Workflow
Editing is different from generating another image with a similar prompt. The editing endpoint needs the actual source image plus the requested change.
The edit tool receives the image information, edit request, Telegram chat ID, and picture ID. That picture ID tells the workflow which Google Drive file to download.
- Retrieve the correct file ID from memory or the image search tool.
- Download that image from Google Drive.
- Send the binary image and edit prompt to OpenAI’s image editing endpoint.
- Convert the returned Base64 image into binary data.
- Send the edited image to Telegram.
- Upload the new version to Drive and log it in Sheets as an edit.
Here is the original illustrated flyer from the cat food example:
After the request to make it more realistic, the workflow returned this version:
Another test used a crocodile lifting weights. I asked the system to add headphones to its head, and the edited result kept the overall scene similar while adding the requested detail. That is the kind of continuity you want from an editing tool.
The Search Images Workflow
The image search workflow serves two different purposes, and that distinction changes what it returns.
- Get an image: Find an earlier asset, download it, and send it to Telegram.
- Prepare an edit: Find the asset and return its ID to the main agent without sending the image again.
The inputs are the user’s intent, the image title or description, and the Telegram chat ID.
An image retrieval agent searches the marketing team log through its Google Sheets tool. A structured output parser makes it return a consistent result containing the image name, file ID, link, and status.
Then two checks control the next step:
- Was the image found? If not, return an image-not-found message to the main agent.
- What is the intent? If the user wants the image, download and deliver it. If the user wants an edit, return the image ID and name.
This is what makes follow-up requests practical. I can ask for an old crocodile image, or ask to change the flyer we just created, without manually locating the file.
The log is not just a record of past runs. It is the lookup source that makes asset reuse possible.
The Blog Post and LinkedIn Workflows
The blog and LinkedIn workflows use almost the same structure. Their main differences are the writing instructions and the visual style requested for the accompanying graphic.
For a blog article, the main agent passes three inputs: the topic, target audience, and Telegram chat ID. In the sleep example, the audience was working professionals and students.
Research before writing
The blog writing agent has access to Tavily for web search. Its instructions tell it to begin with real-time research, then produce a professional, educational, engaging article tailored to the supplied audience.
It also includes source links at the bottom. That gives the written output references instead of leaving it as an unsupported block of generated text.
Build the graphic from the finished article
The full article goes into an image prompt agent. Rather than generating a generic image from the original topic alone, this agent analyzes the completed piece, identifies its main message and highlights, and proposes a matching visual.
A structured output parser returns two fields:
- Title: Used later to name the image file and log entry.
- Prompt: Sent to the image generation endpoint.
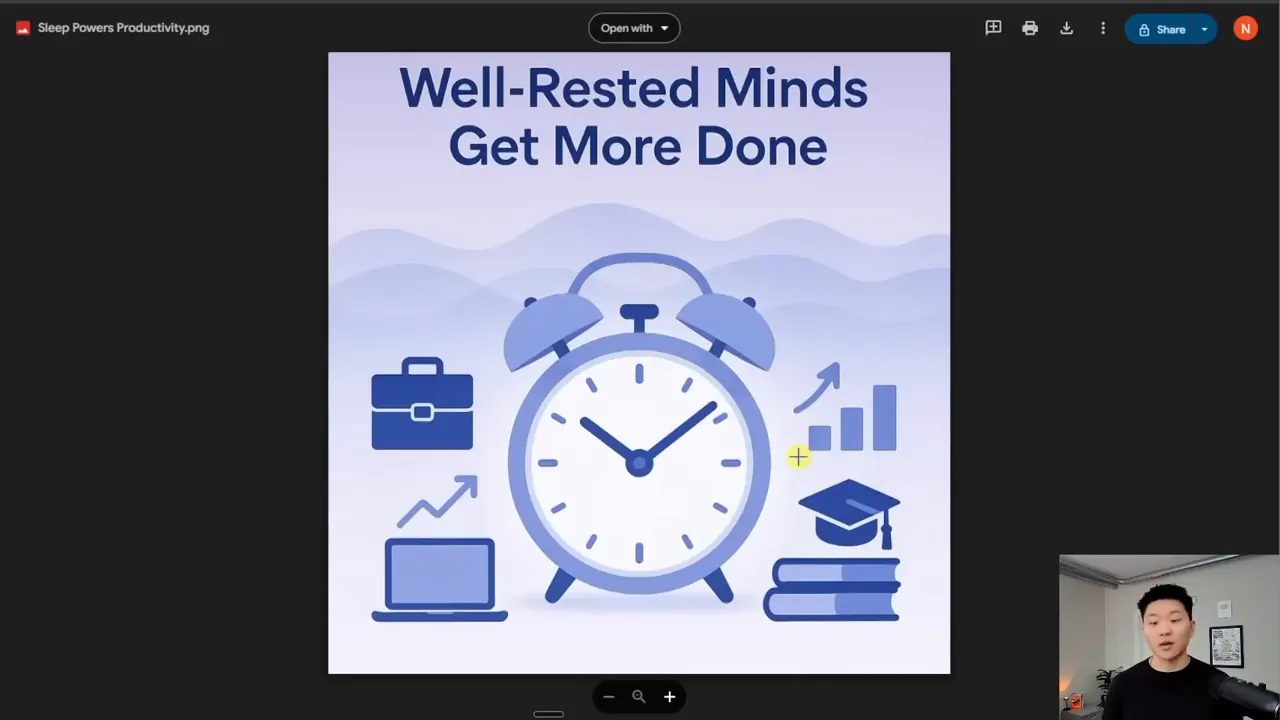
This is why different runs can produce different kinds of graphics. One sleep article received a more statistics-oriented visual, while another received a clock-centered productivity graphic.
Deliver the image and text separately
The workflow generates the graphic, converts it to binary, and sends the photo to Telegram. A separate Telegram step sends the article text.
It then uploads the image to Google Drive and logs the asset information and article content in Sheets. Since this workflow already delivers the content, the main marketing agent does not need to repeat it.
The LinkedIn version follows the same sequence, but its writing prompt is tailored to LinkedIn, and its image prompt instructions produce a different graphic style.
Be careful when inserting prompts into JSON
One small implementation detail can break an otherwise successful run: quotation marks inside dynamically generated prompts.
If you insert a prompt directly into a hand-built JSON request body, unescaped double quotes can make that body invalid. In the template, I used a replacement expression to change double quotes to single quotes as a workaround.
The underlying issue is valid JSON formatting, not a restriction against double quotes in image prompts. Keep an eye on this wherever model-generated text gets inserted into an HTTP request.
The Video Generation Workflow
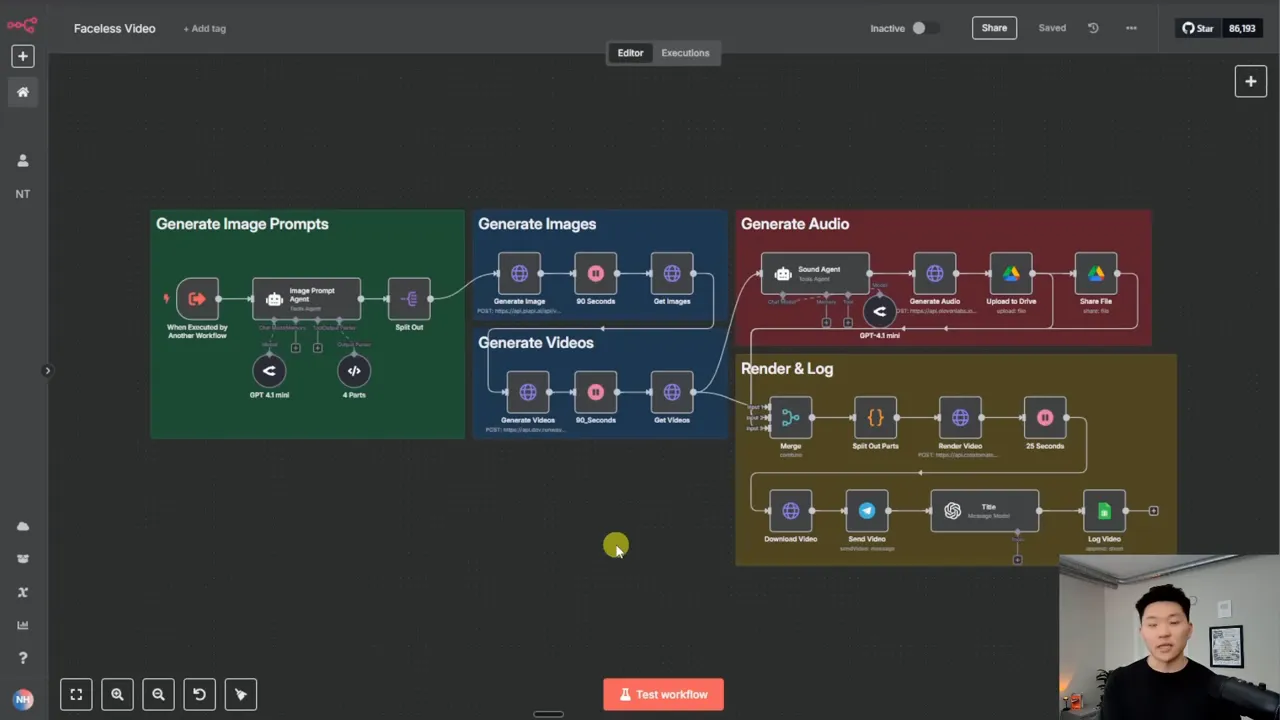
The video tool has a simple input contract: a video topic and Telegram chat ID. Internally, it is the most involved workflow in the system.
The goal is to create four five-second video clips with matching sound effects, then stitch them into one 20-second short.
1. Turn the topic into four connected scenes
An image prompt agent acts as a visual story planner. It takes the topic and creates four cohesive parts, each expressed as a text-to-image prompt.
The structured output parser requires Part One through Part Four. Initially, those four parts are still contained in a single n8n item, so a Split Out node turns them into four separate items.
That allows the next steps to generate one image and one video for each scene.
2. Generate four images with Flux through PiAPI
The workflow sends four requests to PiAPI’s Flux image generation endpoint. Each request contains a different scene prompt.
For the beaver example, the scenes covered gathering materials, arranging sticks, construction, and the finished home.
Image generation is asynchronous. The initial response gives job information while the images are still pending. The template waits 90 seconds, then makes a GET request to check the results and retrieve the image URLs.
There is an important improvement to make here: use polling instead of assuming a fixed wait is long enough.
A polling loop checks the status, waits again if the job is not ready, and checks again. Without that loop, three images might be complete while the fourth is still pending, and the workflow could move forward with a missing scene.
3. Animate each image with Runway
Each image URL is sent to Runway as the prompt image. The workflow also sends prompt text, reusing the scene description to guide the image-to-video generation.
Runway returns task IDs. After another wait, roughly 60 to 90 seconds in this build, the workflow checks those tasks and retrieves the completed video links.
At this stage, there are four silent clips.
4. Create five-second sound effects
A sound prompt agent processes each scene individually and writes a descriptive prompt for background sound effects.
Those prompts go to ElevenLabs, which generates a five-second sound clip for each scene. These are environmental effects rather than narration.
5. Pair the audio and video, then render
The workflow merges the outputs and organizes them so each scene has its matching audio and video source.
Those sources are mapped into a Creatomate template: four video sources and four audio sources, indexed from zero through three.
To configure the rendering template:
- Create a new template in Creatomate.
- Open the source editor and paste the supplied template script.
- Select Use Template, then API Integration.
- Copy the cURL request.
- Import that cURL request into the n8n HTTP Request node.
- Map the four video links and four audio links into the template variables.
Creatomate starts the render. The template waits about 25 seconds before retrieving the finished video. The workflow then downloads it as binary, sends it to Telegram, creates a title, and logs the output.
The timeout issue to understand
In my setup, video creation typically took two to three minutes, sometimes longer. The main agent’s tool call could time out while the video subworkflow was waiting for generation jobs.
That meant the parent workflow could show an error even though the video workflow completed successfully.
The workaround in this build is to let the video subworkflow deliver the final file directly to Telegram and log its own output. If you see a parent error, check the video workflow’s execution history before assuming the render failed.
This is a limitation of the demonstrated setup, not the behavior I would want to leave unexplained. Along with polling and character consistency, it is one of the main areas to improve beyond the starting template.
What It Costs to Run
There are two cost categories: recurring platform plans and usage-based generation charges. The figures below are the approximate prices I used when building this system, not a current pricing guarantee. Model settings and provider plans can change the total.
Hosting and image generation
- n8n Cloud: Approximately $27 per month for the plan I was using.
- OpenAI image creation: Around $0.19 to $0.20 per image with my settings.
- OpenAI image editing: Around $0.19 to $0.20 per edit.
- Blog and LinkedIn graphics: A similar image generation charge because those workflows use the same image model.
- Flux through PiAPI: Approximately $0.015 per image for the video workflow’s scene images.
I also discussed DALL-E 2 and DALL-E 3 as lower-cost alternatives available at the time. The model parameter is where model selection happens, but check current availability and request requirements before changing providers or models. You could also make model selection dynamic if you wanted the agent to choose based on the task.
Video, rendering, and sound
- Runway: Approximately $0.25 per five-second clip, or $1 for four clips.
- Scene images: Four Flux images add approximately $0.06.
- Creatomate: My free trial included 50 credits, and three successful renders had used three credits.
- ElevenLabs: I was using the $5-per-month Starter plan for sound effects.
That puts the four scene images and Runway clips at about $1.06 per video before rendering, sound, text generation, and other costs.
I would not assume every 20-second Creatomate render always costs one credit. My trial usage suggested that rate for those tests, but the plan description also listed 2,000 credits for approximately 200 videos. Verify the credit calculation for your actual template and output settings.
Text generation and reasoning
I used GPT-4.1 and GPT-4.1 mini through OpenRouter across the agents. The rates referenced in the build were:
- GPT-4.1: $2 per million input tokens and $8 per million output tokens.
- GPT-4.1 mini: $0.40 per million input tokens and $1.60 per million output tokens.
Those costs are additional to media generation. Your total depends on how often you run each tool and how much text moves through the agents.
How to Set Up the Free n8n Template
The free resource package includes the workflow JSON files, Google Sheets template, Creatomate template script, setup guidance, and cost document. It is available in my free AI Automation Society community under the resource post for this build.
|
1. Import all seven workflows
Download the main marketing agent and all six tool workflows. In n8n, create an individual workflow for each file and use Import from File to load its JSON.
Importing only the main workflow is not enough. Its tools need the corresponding child workflows to exist in your instance.
2. Reconnect every workflow tool
Open each workflow tool on the main agent and select the correct imported workflow.
For example, the Search Images tool needs to reference your imported search workflow, whatever you named it. Use the open-workflow control to confirm that the reference leads to the right place.
3. Add your credentials and API keys
Configure the services used by the workflows:
- Telegram for incoming requests and outgoing content.
- OpenAI for image generation, editing, and the transcription step.
- OpenRouter for the text models used in this build.
- Google Drive for file storage.
- Google Sheets for the marketing team log.
- Tavily for content research.
- PiAPI for Flux scene images.
- Runway for image-to-video generation.
- ElevenLabs for sound effects.
- Creatomate for the final video render.
Also select your own Google Drive destination folder wherever the workflows upload files.
4. Copy and connect the Google Sheets template
Open the supplied spreadsheet and choose File, then Make a copy. Point the relevant Sheets nodes to your copy and the correct worksheet.
Keep the column names consistent with the template so the title, type, request, ID, link, and post mappings continue to work. Make sure the image search tool reads from that same log.
5. Configure your Creatomate template
Paste the supplied script into a new Creatomate template’s source editor. Then import its API integration cURL request into the rendering node and map the media variables.
If you keep the existing request configuration and mappings, replace the template ID with your own and configure your credentials.
6. Check the complete path from request to delivery
Once the tools, credentials, storage destinations, and template references are connected, the system has what it needs to run. A successful request should produce the requested content, send it to the correct Telegram chat, and add the appropriate record to your log.
For video, remember the two known implementation details: fixed waits are less reliable than polling, and a parent-agent timeout does not necessarily mean the child workflow failed.
The Most Useful Part Is the Architecture
The individual outputs are useful, but the bigger idea is how the system is organized.
The main agent manages the conversation. Specialized workflows manage execution. Google Drive stores the assets, and Google Sheets makes them retrievable.
That separation is what lets a short Telegram message trigger a fairly involved production process without making the central agent responsible for every technical step.
You still need to configure the integrations, check the outputs, and improve the rough edges. But as a no-code starting point, this gives you a connected marketing assistant that can create content, revise it, find it again, and keep its work organized.


