I took a manual process, brain dumped it into ChatGPT, and handed the resulting instructions to Claude Code. About three minutes later, I had an n8n workflow ready to open in my instance.
Was it perfect? No. Claude found problems with the Code node parameters and Slack configuration, then worked through several corrections. But that is exactly what makes this setup interesting. It does not just generate workflow JSON and leave you to figure out the rest. With the right tools, it can research nodes, build a workflow, validate it, and make changes directly in n8n.
The setup combines Claude Code, an n8n MCP server, and n8n skills. And you do not need to be a developer to get started. The most important skill is being able to explain what you want clearly, then ask questions when something does not make sense.
What You'll Learn
- Combine Claude Code, an n8n MCP server, and skills to build workflows directly in your instance.
- Use persistent project instructions and Plan mode to clarify requirements before implementation.
- Verify credentials, model selections, expressions, and output before activating a generated workflow.
- Scale requests carefully because large builds and repeated retries can encounter infrastructure limits.
Table of Contents
- 1. Set Up Claude Code Inside VS Code
- 2. Give the Project Persistent Instructions With CLAUDE.md
- 3. Understand the n8n MCP Server and Skills
- 4. Install the Tools and Connect Your n8n Instance
- 5. Build a Daily AI Research Newsletter Workflow
- 6. Connect Credentials and Check the Actual Configuration
- 7. Review the Finished Email, Then Iterate
- 8. Use Claude as a Planning Partner, Not Just a Builder
- 9. Know the Limits Before Making Huge Requests
- The Skill That Matters Most Is Clear Communication
1. Set Up Claude Code Inside VS Code
I prefer using Claude Code inside Visual Studio Code because the interface feels much more approachable than working entirely in a terminal. You can use other environments, but VS Code gives us a straightforward place to manage project files and talk to Claude.
- Download Visual Studio Code for your operating system.
- Open VS Code and select Extensions in the left sidebar.
- Search for Claude Code and install the Anthropic extension.
- Follow the sign-in prompts to connect your Claude account.
- Open the Explorer panel and choose a folder for your project.
For this project, I created a parent folder called agentic-workflows, then an empty project folder called n8n-builder. The names are not important. What matters is giving this project its own workspace.
The Explorer shows the files in that folder. The Claude Code panel is where you make requests, review plans, and follow the actions Claude takes. You can open that panel using the Claude Code button near the top right of VS Code.
Think of the layout as two parts: your project files and your conversation with the agent working on those files. That is a lot less intimidating than thinking you suddenly need to become a programmer.
2. Give the Project Persistent Instructions With CLAUDE.md
Before asking Claude to build anything, give it some context about the project.
Create a Markdown file named CLAUDE.md in the project root. This acts as persistent project guidance, almost like a project-level system prompt. It explains what the workspace is for, which tools are available, and how Claude should approach the work.
You do not have to write the whole thing yourself. Use Claude to help create it.
Start in Plan Mode
Claude Code offers several permission modes, including Plan mode, Ask before edits, Edit automatically, and, when enabled, Bypass permissions.
Plan mode is where I start when I am figuring out what I want. It gives Claude room to investigate, ask clarifying questions, and propose an approach before making changes.
For the initial project instructions, explain that:
- The project exists to build high-quality n8n workflows.
- Claude will have access to an n8n MCP server and n8n skills.
- The workflows should be created in your n8n instance.
- You want a consistent process for researching, building, validating, and deploying them.
Claude may ask which n8n environment you use and which tools you intend to install. In my case, I specified n8n Cloud and supplied the repositories for the MCP server and skills so Claude could research them before finalizing the file.
What the Instructions Should Cover
The resulting file included the environment, MCP tools, skills, workflow-building process, project structure, and safety rules.
The core workflow-building sequence was simple:
- Understand the requirements.
- Search existing templates.
- Research the relevant nodes.
- Build the workflow.
- Validate it.
- Deploy it.
This gives Claude a repeatable process instead of letting the project accumulate files without much organization. It also reduces how often you need to explain the same expectations in a fresh conversation.
You can use /clear to clear the current conversation once a task is complete. The project instructions remain in the workspace.
A Note About Bypass Permissions
In my setup, I enabled the VS Code setting labeled Allow dangerously skip permissions so Bypass permissions was available. That mode lets Claude take actions without asking for approval at every step.
It is convenient, but it is not a safety boundary. Project instructions do not prevent every unwanted action. If you are just getting started, keep approvals enabled until you understand what Claude can access, especially once you connect an n8n instance.
3. Understand the n8n MCP Server and Skills
The architecture is straightforward: you talk to Claude Code, and Claude uses tools to work with n8n.
A strong model can understand your request and generate JSON, but that alone does not guarantee it will choose the right n8n nodes, parameters, expressions, or connections. That is why we add two complementary resources.
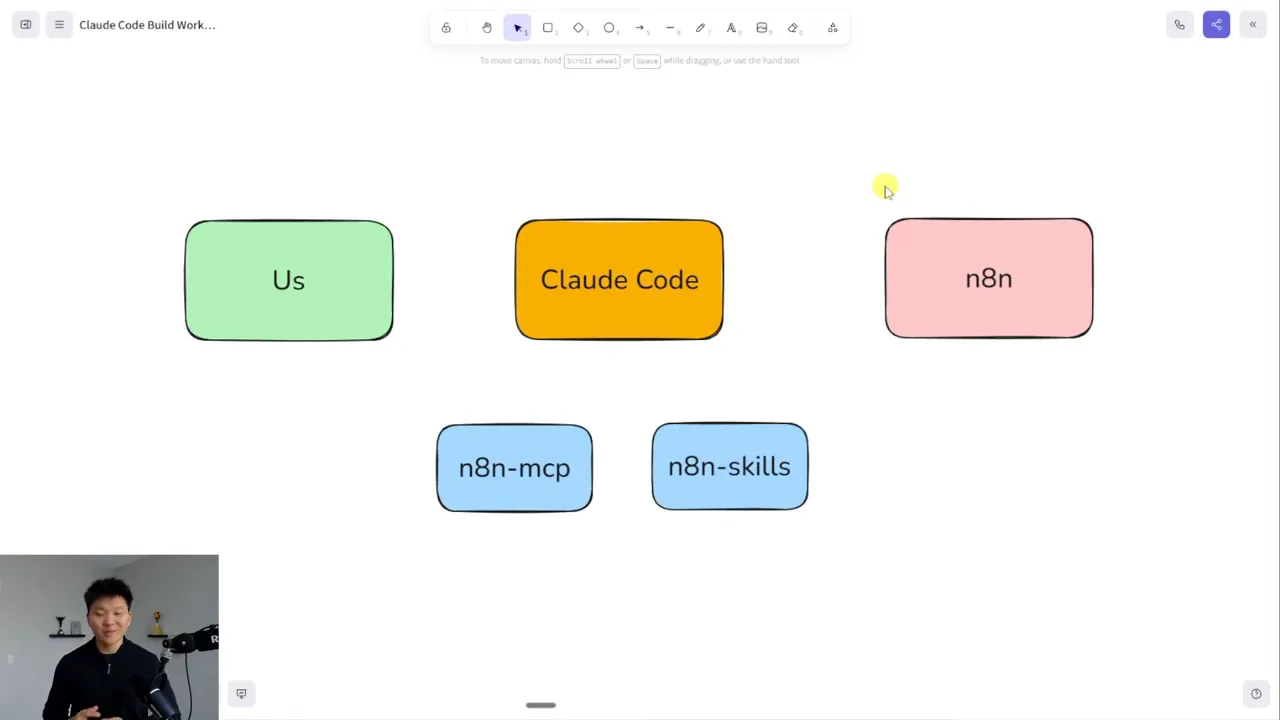
The MCP Server Provides Tools and n8n Reference Material
The n8n MCP server used here gives Claude access to node documentation, configuration details, and workflow templates. With an instance connection configured, it can also create, update, activate, and manage workflows.
At the time of this setup, the project advertised coverage of roughly 1,100 nodes, 99% property accuracy, and more than 2,700 workflow templates. Those are the project’s stated coverage figures, not a guarantee that every generated workflow will be correct.
The practical benefit is that Claude can look things up rather than relying entirely on what the model already knows. It can search for a node, inspect its configuration, and use an existing template as a reference.
Skills Teach Claude How to Apply That Knowledge
The companion n8n skills package covers seven areas:
- n8n expression syntax.
- Using the n8n MCP tools effectively.
- Workflow patterns.
- Workflow validation.
- Node configuration.
- JavaScript in Code nodes.
- Python in Code nodes.
Think of skills as specialized instructions that Claude can load when they become relevant. It does not need to read every detail about every n8n topic for every message.
The MCP server supplies capabilities and reference material. The skills supply guidance for using them well. Together, they make Claude much more useful as an n8n workflow builder.
4. Install the Tools and Connect Your n8n Instance
You can follow the installation instructions in the repositories manually, but my preferred approach is to give Claude the repository links and ask it to do the setup.
Be explicit about the outcome: install the n8n MCP server and n8n skills, and make sure Claude Code can actually access both from this project.
That last part matters. Downloading a repository is not the same as making its tools or skills available to the running agent.
Provide the Instance URL and API Key
For workflow management, Claude needs a connection to your n8n instance. In this setup, it requested two pieces of information:
- Instance URL: the base address of the n8n instance, without the trailing
/homepage path. - API key: a key created in n8n’s settings.
In n8n Cloud, I opened Settings, selected n8n API, and created a key named for the Claude Code demo. For additional reference, n8n documents this process in its API authentication guide.
Treat that key as a secret. It enables the workflow-management capabilities you are connecting, so do not publish it or commit a configuration file containing it to a public repository.
Claude then created the MCP configuration and installed the skills. The workspace contained the project instructions, an MCP JSON configuration, and the cloned skills repository.
In my installation, Claude reported that the skills were installed globally, while the cloned repository remained as reference material. Installation details can differ, so ask Claude to explain which files are required before deleting anything.
Restart and Verify the Connection
After installation, restart Claude Code so it can load the new tools and skills. I closed VS Code, reopened the same project folder, and opened Claude again.
Then test three things separately:
- Node search: ask Claude to search for the Webhook node using the n8n MCP server.
- Instance access: ask whether it can create workflows in your connected instance.
- Skill availability: ask it to confirm that all seven n8n skills are available.
In my test, Claude called the node-search tool and returned Webhook-related results. It also checked the instance connection and confirmed the skills.
This is a useful habit: do not assume installation succeeded just because files appeared. Ask Claude to demonstrate that the capabilities work.
5. Build a Daily AI Research Newsletter Workflow
With the setup working, I moved on to a practical example: a daily research newsletter for an AI automation agency focused on voice agents.
The requested workflow had a clear business outcome:
- Run every morning at 7:00 a.m.
- Research AI developments, especially automation and voice-agent technology.
- Use one AI agent for research.
- Use a separate AI agent to write an HTML newsletter.
- Send the finished newsletter through Gmail.
I requested GPT-5 through OpenRouter for the research agent and Claude Sonnet 4.5 through OpenRouter for the newsletter writer.
Plan First, Then Answer the Missing Questions
I started in Plan mode and explained the workflow in ordinary language. Claude researched the relevant nodes and asked for details I had not supplied:
- Which email address should receive the newsletter?
- Which web-search tool should the research agent use?
- Which time zone should the schedule follow?
I chose Perplexity for research and Eastern time for the schedule.
This is one of the biggest advantages for beginners. You do not have to anticipate every implementation detail yourself. A planning conversation can surface missing requirements before they become problems in the workflow.
Specify Deployment, Not Just JSON Generation
Claude produced a detailed implementation plan, but I caught an important mismatch: it planned to create a local JSON workflow file.
That was not the full outcome I wanted. I wanted the workflow created directly in my n8n instance.
So I clarified the request: approve the architecture, create it in the connected instance, validate it, and return a direct link.
Be precise about the deliverable. Generating an importable file and deploying a workflow into n8n are different tasks.
Claude then worked through a short task list: create the workflow, validate it, and report completion with the link and remaining setup steps.
6. Connect Credentials and Check the Actual Configuration
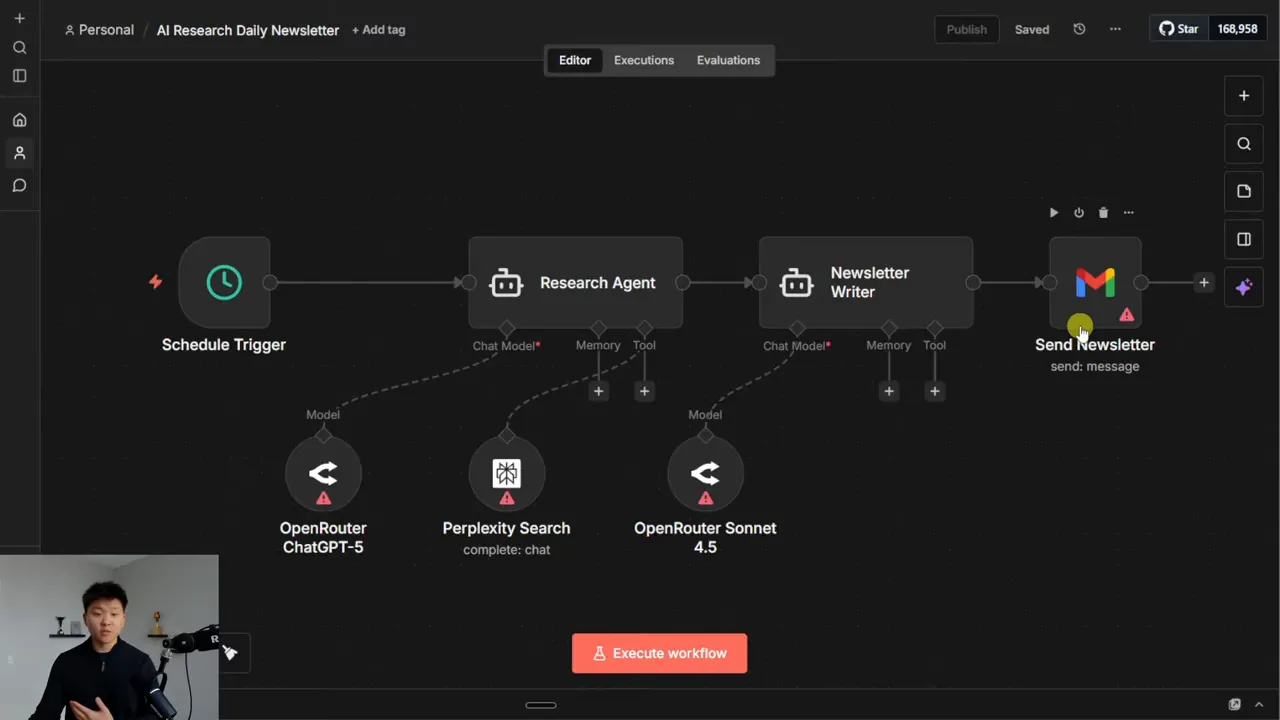
The generated workflow contained the expected structure: a schedule trigger, research agent, newsletter writer, and Gmail sending node, with model and research-tool connections beneath the agents.
I connected the required credentials in n8n, then ran the workflow manually to simulate the morning schedule.
This is where an important limitation showed up.
I had requested GPT-5 and Sonnet 4.5, but the generated configuration used GPT-4.1 and Sonnet 4. Claude also filled in token and temperature settings.
The overall workflow structure was useful, but the model selections did not match the request. That is why validation cannot stop at “Claude said it is done.”
Before activating a generated workflow, check:
- The exact models and providers selected.
- The schedule and time zone.
- The destination email address.
- The credentials attached to each service.
- The expressions passing information between nodes.
- The prompts and output formatting.
A workflow can run successfully and still differ from your requirements.
Inspect the Research Agent’s Prompts
The research agent had a useful prompt structure. Its user message asked for recent developments in AI automation and voice-agent technology, with a focus on the previous week and source citations.
Its system instructions positioned it as a research analyst specializing in those topics and emphasized thoroughness, concision, and actionable insights for an agency owner.
During the test, the agent used its Perplexity tool multiple times. Its output covered breaking AI news, conversational technology, automation platforms, industry trends, new voice-AI products, and actions for agency owners.
That is a strong starting point from a fairly simple request.
Check the Handoff to the Newsletter Writer
The writer’s input used an n8n expression to pull in the research agent’s output. It then instructed the writer to turn those findings into a professional HTML newsletter using the styling guidance in its system prompt.
This handoff is worth inspecting closely. Two connected agents are only useful if the second one receives the information it needs from the first.
The writer also had a system message defining HTML styling and newsletter structure, rather than being left to improvise the format with no guidance.
7. Review the Finished Email, Then Iterate
The test produced an HTML email with a dated daily-brief subject line. The finished newsletter included:
- An executive summary.
- Top stories and headlines.
- A dedicated voice-agent section.
- Quick updates.
- Action items for agency owners.
- A list of sources.
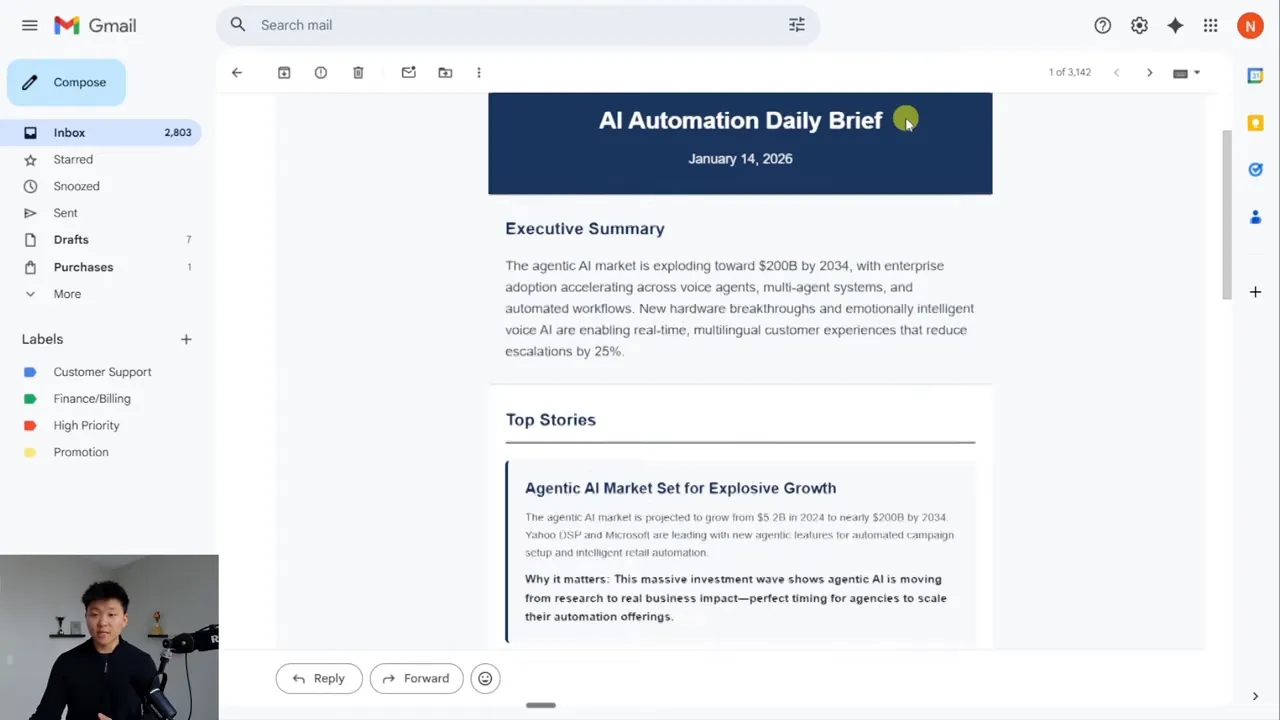
The voice-agent focus was especially useful because it reflected the agency niche I had described. The Gmail node also had n8n attribution disabled, even though I had not explicitly requested that setting.
From here, you can return to Claude Code and ask for changes to the existing workflow: revise the research prompt, adjust the newsletter structure, or switch a model. With the instance connected, Claude can update the deployed workflow rather than forcing you to start again.
I could build this particular workflow manually in under an hour. The bigger benefit is how much easier it becomes to brainstorm the architecture, fill in missing requirements, and get a working first version.
8. Use Claude as a Planning Partner, Not Just a Builder
The more complicated the automation becomes, the more valuable the planning conversation is.
For a simple workflow, you may already know the nodes you need. For a larger system, you may still be figuring out how information should move through it or which responsibilities belong to separate agents.
That is where Plan mode helps. It encourages you to work through the design before authorizing implementation.
Another useful approach is to sketch the workflow first and provide a screenshot of that wireframe. A diagram gives Claude a clearer picture of the architecture you have in mind. I see this as a promising way to communicate intent, not something you must do for every build.
And if Claude suggests that you install something manually when you want it to handle the setup, say so. Be direct about the work you want delegated, while keeping appropriate approval controls in place.
You can also ask it to explain anything unclear. Ask why it chose a node, what a configuration does, or how two steps pass data between them. You are not expected to know all of that before you begin.
9. Know the Limits Before Making Huge Requests
I also pushed this setup too far.
While testing a much larger workflow of around 60 nodes, my n8n Cloud instance became unresponsive. It was still unavailable more than an hour later and displayed a 522 connection timeout error. A different n8n Cloud instance I owned was still working.
I suspected the large request and repeated attempts had overwhelmed something, but I did not confirm the root cause. This was an issue with my particular instance, not evidence that n8n Cloud as a whole was down or that 60 nodes is a universal limit.
The practical lesson is to be cautious when Claude is making a massive request, timing out, and repeatedly trying again. Do not assume unlimited retries will fix the problem.
Self-hosting gives you more direct access to restart your infrastructure, but a restart is not a guaranteed fix for every underlying problem. With a managed instance, you may need support to help investigate or recover it.
Start with manageable workflows, inspect the results, and increase complexity deliberately. A capable agent does not remove infrastructure limits or the need for human review.
The Skill That Matters Most Is Clear Communication
You do not need to read every line of code to start using Claude Code for n8n. You do need to describe the outcome, answer clarifying questions, review the plan, and test what gets built.
The repeatable process is simple: give the project persistent instructions, connect the right tools, plan the workflow, deploy it explicitly, then check the real configuration and output.
That is what makes this more than a workflow generator. It is a practical way to turn a rough business process into a conversation, a plan, and a working automation you can keep improving.
I am sharing the CLAUDE.md file from this setup in my free AI Automation Society community, alongside the associated resource post, so you can use it as a starting point for your own n8n builder project.
|